and electrics to a W211 are you? some tips and hints which may or may not be of help - (Mods should this be in the DIY section?) -
Preamble: - I have fitted many tow bars in my time the first in 1968 to a Ford ConsulMK2 when you had to measure and drill all the holes required in the rear end to accommodate the tow-bar so fitting one to a modern motor is oh so easy and as long as you have the tools, good basic skill level and ideally someone to give a helping hand then all should be well.
As a start point it is always extremely useful if you have the appropriate MB dismantling instructions for the boot lining and rear bumper and for this I am so grateful we have a guy like Television - aka Malcolm who is always willing to help out in these matters.
Choosing a TB: - There many variety's on the market so do some research before buying. I chose the Westfalia bar with a removable hitch not the cheapest but is an OE supplier to MB so I knew it would be 'right for the job' and 'Right Connections UK Ltd' for the wiring loom.
When doing your research ask the manufacture to send you the fitting instructions for their TB's I did and found them all extremely helpful this allowed me to compare not just the marketing/sales blurb but the all important construction and fitting arrangements. I also asked 'Right Connections to send me the installation instructions for their wiring kit and again they were very helpful and obliging.
By doing the above you get to understand what you are faced with and helps when you come to do the job.
Dismantling: - The rear end of the W211 is a reasonably easy job and with the instructions at least you can see where the myriad of screws and (plastic) expansion rivets are, well not quite.
Before starting I chocked the front wheels fore and aft as it is useful to lift the back end up with a trolley jack then support the car on stands this will allow the wheels to 'drop away' and give you some space to get at the screws and rivets holding the wheel arch lining to the body, if you don't do this and it is strictly not necessary you will be working in a really confined space, it also gives you a bit more height when removing the two OE brackets which the new TB does not require.
The bumper is a large but not heavy piece to remove on your own - it can be done and I did it but another pair of hands would have made it so quicker and easier indeed assembly would have been a lot easier! The dismantling instructions are as I have said are really useful BUT they do not show all fixings that need to be removed in my case there were two extra plastic blind rivets either side in the wheel arch area that need to be extracted.
As noted above I had to remove the two OE support brackets which hold the aluminuim bar which is behind the bumper and whilst four of the eight retaining bolts are easy to get at as they are in the wheel well the other four are sited ajacent the left and right exhaust silencer boxes and are certainly not easy to get at - so expect them to be hard to remove even with a soaking of rust release fluid. I removed the rubber hangers and inserted a block of wood between the body work and the silencer just to give me a little more space in which to work. I ended up grinding away two of the retaining nuts as they were well and truly siezed up, (see attached picture) well in one case it had been put on x threaded and was not even tight to the body and as the bolts are welded to the brackets the only forward was by grinding away the welded head - so be warned.
All in all it took far longer to dismantle than it did to fit the TB and Wiring loom.
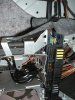
Assembly of the Westfalia is simplicity in itself and the instructions are a joy to follow and if you have taken the time to pre-read them the job is so much quicker. The same can be said of the 'Plug and Play' wiring loom as it is fully 'assembled' even down to having the correct size grommet to fit the pre drilled hole in the bodywork no extra curricular activities required in the terms of fitting connectors, splicing wires or cutting into the cars loom. The instructions are superb and the fitting colour coded just about anyone who is not colour blind could do this job indeed if you are colour blind just follow the numbers on the instructions which all tally with those on the rear SAM unit. One important point here before connecting up the loom to the car is to remember to disconnect the car battery - negative/earth terminal, that rear SAM is bl**dy expensive! The picture shows one part of the wiring loom curled up and located in the alloy housing used for the satnav unit.
Re-fitting the bumper is as I have said easier with two people but can be done if you are VERY careful, locate one side and fit one of the screws to hold it in place then fit the other side and line it all up then replace the fixings.
Then fit the boot linings and that's it.
General points.
Double check that all the bolts are tight in this case 16 + 2 refitted to hold the OE alloy bar.
Coat all the new metal work with rust inhibitor.
The Westfalia TB has rubber gaiters which seal off the square chassis members to stop water ingress and it is worthwhile taking a bit of time to ensure they are located as described in the instructions. If you purchase a bar that does not have this feature make certain you foam up the open ends if not water will get in. Check out the attached photo showing the foam plastic seal used by MB to stop water ingress
Tidy up the loom using plastic ties - supplied in this case.
Stand back and feel satisfied that you have saved yourself between £120/250
Regrets? Would have liked to have had a helping hand, and I failed to take more 'active' photos
Preamble: - I have fitted many tow bars in my time the first in 1968 to a Ford ConsulMK2 when you had to measure and drill all the holes required in the rear end to accommodate the tow-bar so fitting one to a modern motor is oh so easy and as long as you have the tools, good basic skill level and ideally someone to give a helping hand then all should be well.
As a start point it is always extremely useful if you have the appropriate MB dismantling instructions for the boot lining and rear bumper and for this I am so grateful we have a guy like Television - aka Malcolm who is always willing to help out in these matters.
Choosing a TB: - There many variety's on the market so do some research before buying. I chose the Westfalia bar with a removable hitch not the cheapest but is an OE supplier to MB so I knew it would be 'right for the job' and 'Right Connections UK Ltd' for the wiring loom.
When doing your research ask the manufacture to send you the fitting instructions for their TB's I did and found them all extremely helpful this allowed me to compare not just the marketing/sales blurb but the all important construction and fitting arrangements. I also asked 'Right Connections to send me the installation instructions for their wiring kit and again they were very helpful and obliging.
By doing the above you get to understand what you are faced with and helps when you come to do the job.
Dismantling: - The rear end of the W211 is a reasonably easy job and with the instructions at least you can see where the myriad of screws and (plastic) expansion rivets are, well not quite.
Before starting I chocked the front wheels fore and aft as it is useful to lift the back end up with a trolley jack then support the car on stands this will allow the wheels to 'drop away' and give you some space to get at the screws and rivets holding the wheel arch lining to the body, if you don't do this and it is strictly not necessary you will be working in a really confined space, it also gives you a bit more height when removing the two OE brackets which the new TB does not require.
The bumper is a large but not heavy piece to remove on your own - it can be done and I did it but another pair of hands would have made it so quicker and easier indeed assembly would have been a lot easier! The dismantling instructions are as I have said are really useful BUT they do not show all fixings that need to be removed in my case there were two extra plastic blind rivets either side in the wheel arch area that need to be extracted.
As noted above I had to remove the two OE support brackets which hold the aluminuim bar which is behind the bumper and whilst four of the eight retaining bolts are easy to get at as they are in the wheel well the other four are sited ajacent the left and right exhaust silencer boxes and are certainly not easy to get at - so expect them to be hard to remove even with a soaking of rust release fluid. I removed the rubber hangers and inserted a block of wood between the body work and the silencer just to give me a little more space in which to work. I ended up grinding away two of the retaining nuts as they were well and truly siezed up, (see attached picture) well in one case it had been put on x threaded and was not even tight to the body and as the bolts are welded to the brackets the only forward was by grinding away the welded head - so be warned.
All in all it took far longer to dismantle than it did to fit the TB and Wiring loom.
Assembly of the Westfalia is simplicity in itself and the instructions are a joy to follow and if you have taken the time to pre-read them the job is so much quicker. The same can be said of the 'Plug and Play' wiring loom as it is fully 'assembled' even down to having the correct size grommet to fit the pre drilled hole in the bodywork no extra curricular activities required in the terms of fitting connectors, splicing wires or cutting into the cars loom. The instructions are superb and the fitting colour coded just about anyone who is not colour blind could do this job indeed if you are colour blind just follow the numbers on the instructions which all tally with those on the rear SAM unit. One important point here before connecting up the loom to the car is to remember to disconnect the car battery - negative/earth terminal, that rear SAM is bl**dy expensive!
The picture shows one part of the wiring loom curled up and located in the alloy housing used for the satnav unit.Re-fitting the bumper is as I have said easier with two people but can be done if you are VERY careful, locate one side and fit one of the screws to hold it in place then fit the other side and line it all up then replace the fixings.
Then fit the boot linings and that's it.
General points.
Double check that all the bolts are tight in this case 16 + 2 refitted to hold the OE alloy bar.
Coat all the new metal work with rust inhibitor.
The Westfalia TB has rubber gaiters which seal off the square chassis members to stop water ingress and it is worthwhile taking a bit of time to ensure they are located as described in the instructions. If you purchase a bar that does not have this feature make certain you foam up the open ends if not water will get in. Check out the attached photo showing the foam plastic seal used by MB to stop water ingress
Tidy up the loom using plastic ties - supplied in this case.
Stand back and feel satisfied that you have saved yourself between £120/250
Regrets? Would have liked to have had a helping hand, and I failed to take more 'active' photos