David Pemberton
Senior Member
- Joined
- Jul 8, 2006
- Messages
- 89
- Reaction score
- 4
Part 1 of 2
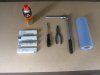
Tools, parts & consumables needed:
View attachment 3589
(Click for larger image)
Multi-meter (not shown)
Torx 30 bit and driver
Pliers
Torque wrench
10 mm deep socket
Extension bar for socket
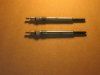
4 x glow plugs (Mercedes part A001 159 49 01)
Penetrant spray (3-in1 Professional from Halfords)
Elephant bog roll
Time to do the job: 1 hour (I spread this over a week, see below as to why this makes the job easier)
Expertise: moderate (about the same as changing spark plugs or changing engine oil)
Car on which plugs changed: C220 CDI, 2000 W-plate / 202 193
[NB the use of left and right relate the car as viewed from the driver’s seat looking forward.]
The first symptom that something is wrong with your glow plugs may be that the glow plug warning light comes back on immediately after the engine has started, and remains on for up to three minutes before going out for the rest of the journey. The reason that the light comes back on (after going out to indicate that pre-heat has finished) is that the glow plugs continue to work for up to three minutes after the engine has started to improve cold running. The system detects that there is a problem during this after-heat phase and lights the warning lamp.
The diagnosis method is to test the electrical attributes of the glow plug system (it is an electrical problem that has tripped the warning light) and to do this you’ll need a multi-meter that can measure resistance (ohms).
Open the bonnet to its fully upright service position by releasing the hinge locks (left side first) and raising it to the vertical, position whereupon the hinge locks will re-catch to hold it securely (to return it to its normal position release the left side first, the right side doesn’t need releasing on the way down). Remove the engine cover by unscrewing four Torx screws using a Torx 30 bit. You may also need to remove the oil filler cap to make it easier to slide the cover off. Remember to replace the oil filler cap immediately so that debris can’t enter the engine.
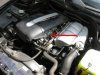
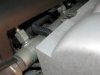
The glow plugs are located on the upper left side of the engine (see picture).
View attachment 3584
(Click for larger image)
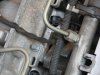
Each plug has a push-on black electrical connector cap.
View attachment 3588
(Click for larger image)
Remove the cap by gripping it with pliers and gently but firmly pulling upwards. Test each plug with the multi-meter set to measure resistance. Touch one of the multi-meter probes to the engine (for a good earth) and the other to the silver tip of the glow plug. The three working glow plugs on my car gave a reading of 0.6 ohms, the defective glow plug read zero. If all the plugs have a similar reading (and I’ve seen elsewhere the acceptable range being 0.5 to 1.5 ohms) then the plugs are probably OK and this DIY isn’t for you. You could continue your investigation by checking the operating voltage for each plug of 11.5v, and, if your meter can manage it, the current draw of ~15 amps. That way you can see if there is a break in the individual feed to a plug and perhaps trace the problem back to the glow plug control unit.
Continued in Part 2
Tools, parts & consumables needed:
View attachment 3589
(Click for larger image)
Multi-meter (not shown)
Torx 30 bit and driver
Pliers
Torque wrench
10 mm deep socket
Extension bar for socket
4 x glow plugs (Mercedes part A001 159 49 01)
Penetrant spray (3-in1 Professional from Halfords)
Elephant bog roll
Time to do the job: 1 hour (I spread this over a week, see below as to why this makes the job easier)
Expertise: moderate (about the same as changing spark plugs or changing engine oil)
Car on which plugs changed: C220 CDI, 2000 W-plate / 202 193
[NB the use of left and right relate the car as viewed from the driver’s seat looking forward.]
The first symptom that something is wrong with your glow plugs may be that the glow plug warning light comes back on immediately after the engine has started, and remains on for up to three minutes before going out for the rest of the journey. The reason that the light comes back on (after going out to indicate that pre-heat has finished) is that the glow plugs continue to work for up to three minutes after the engine has started to improve cold running. The system detects that there is a problem during this after-heat phase and lights the warning lamp.
The diagnosis method is to test the electrical attributes of the glow plug system (it is an electrical problem that has tripped the warning light) and to do this you’ll need a multi-meter that can measure resistance (ohms).
Open the bonnet to its fully upright service position by releasing the hinge locks (left side first) and raising it to the vertical, position whereupon the hinge locks will re-catch to hold it securely (to return it to its normal position release the left side first, the right side doesn’t need releasing on the way down). Remove the engine cover by unscrewing four Torx screws using a Torx 30 bit. You may also need to remove the oil filler cap to make it easier to slide the cover off. Remember to replace the oil filler cap immediately so that debris can’t enter the engine.
The glow plugs are located on the upper left side of the engine (see picture).
View attachment 3584
(Click for larger image)
Each plug has a push-on black electrical connector cap.
View attachment 3588
(Click for larger image)
Remove the cap by gripping it with pliers and gently but firmly pulling upwards. Test each plug with the multi-meter set to measure resistance. Touch one of the multi-meter probes to the engine (for a good earth) and the other to the silver tip of the glow plug. The three working glow plugs on my car gave a reading of 0.6 ohms, the defective glow plug read zero. If all the plugs have a similar reading (and I’ve seen elsewhere the acceptable range being 0.5 to 1.5 ohms) then the plugs are probably OK and this DIY isn’t for you. You could continue your investigation by checking the operating voltage for each plug of 11.5v, and, if your meter can manage it, the current draw of ~15 amps. That way you can see if there is a break in the individual feed to a plug and perhaps trace the problem back to the glow plug control unit.
Continued in Part 2