2.3-16v fuel pressure

OP
U

ukhozi

Active Member
Joined
Feb 13, 2009
Messages
35
Reaction score
0
Location
Estepona, Spain
Website
ukhozi.page.tl
Your Mercedes
1987 2.3-16v, 2001 A170 (W168) Elegance TDi Auto, Eagle SS /VW kit, 1999 Suzuki AN400
  • Thread Starter
  • Thread starter
  • #21
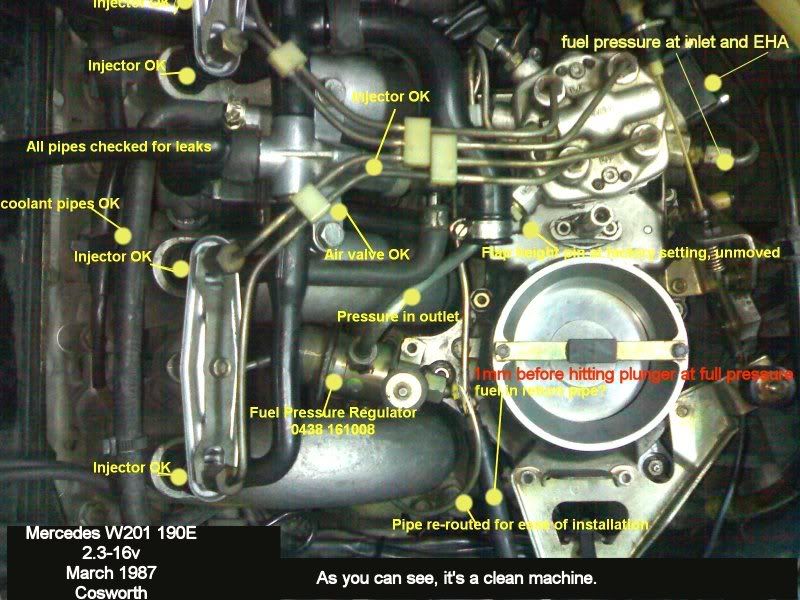
There is fuel returning to the tank and when the pumps run first thing in the morning as opposed to re-run after the pressure has built up, they run fast and then as pressure builds quickly and they run slower just before shutting off, this indicates a build up of pressure in the system also.
Just in case the FPR is too open and not providing the 5.8 bar back pressure required, I am going to restrict the return pipe to artificially create resistant and build a guaranteed pressure in the distributor. We’ll see what happens.
Bit limited as to how much I can do in a day as it’s in an underground garage under the house and even with a large fan going all the time fumes build up to a point I have to pack it in and wait for the area and my head to clear.
I have to get it started before I can do a "hot" test. Return flow to the tank, engine running or when ignition on and sufficient pressure already in the distributor?
I know I should do a pressure test and I spent most of yeasterday trying to rent, borrow a set of gauges with no luck and I cannot afford to buy any.
 
Last edited:

Number_Cruncher

Senior Member
Joined
Oct 10, 2007
Messages
1,806
Reaction score
3
Your Mercedes
1995 W124 E300D TE
>>There is fuel returning to the tank

Then, sorry, I've nothing else to suggest short of pressure testing.

Although I'm now guessing, it sounds to me like something has been connected up back to front.
 
OP
U

ukhozi

Active Member
Joined
Feb 13, 2009
Messages
35
Reaction score
0
Location
Estepona, Spain
Website
ukhozi.page.tl
Your Mercedes
1987 2.3-16v, 2001 A170 (W168) Elegance TDi Auto, Eagle SS /VW kit, 1999 Suzuki AN400
  • Thread Starter
  • Thread starter
  • #23
I don't think there can be anything connected up wrong but just in case I attach the latest photo of the set up.
fuelsystemwithwords.jpg
 
OP
U

ukhozi

Active Member
Joined
Feb 13, 2009
Messages
35
Reaction score
0
Location
Estepona, Spain
Website
ukhozi.page.tl
Your Mercedes
1987 2.3-16v, 2001 A170 (W168) Elegance TDi Auto, Eagle SS /VW kit, 1999 Suzuki AN400
  • Thread Starter
  • Thread starter
  • #24
Last night I clamped a mole grip onto the return pipe from the FPR so producing high pressure in the disatributor, still dry, disconnected the EHA and throttle sensors, still no good. going bonkers and looking at a box of matches with an evil look in my eyes. AH, ha ha ha ha, nurse the medication, quick!!
 
OP
U

ukhozi

Active Member
Joined
Feb 13, 2009
Messages
35
Reaction score
0
Location
Estepona, Spain
Website
ukhozi.page.tl
Your Mercedes
1987 2.3-16v, 2001 A170 (W168) Elegance TDi Auto, Eagle SS /VW kit, 1999 Suzuki AN400
  • Thread Starter
  • Thread starter
  • #25
Sorted!!! :D :D :D
I ended up with doing everything I shouldn't and stripped out a couple of the distributors I had (002 & the original 028)and rebuilt one good one in the 028 body. Took the best bits, as in O rings, seals, diaphragms etc and cleaned, checked and assembled. set the plunger base plug so the slits just cracked. installed it and set the air flap with 1mm before it touched on full pressure.
I installed the 2 Ltr fuel pressure regulator which I know is a lower pressure rating than the 2.8 bar of the Cossie but it all worked! I cranked it over for about 20 seconds and it staggered into life and stay alive, tick over at 900 sweet but a bit rich on running so a bit of tuning needed. All I need to do now is box it up and fit eh air filter without spoiling anything and sell the bugger.
 
Last edited:
OP
U

ukhozi

Active Member
Joined
Feb 13, 2009
Messages
35
Reaction score
0
Location
Estepona, Spain
Website
ukhozi.page.tl
Your Mercedes
1987 2.3-16v, 2001 A170 (W168) Elegance TDi Auto, Eagle SS /VW kit, 1999 Suzuki AN400
  • Thread Starter
  • Thread starter
  • #26
Combination of distributor, fuel pressure regulator and settings, once you throw away all the stuff like the Bosch KE-Tronic manual, Mercedes WIS and Haynes and stop worrying about the electrical side, which in short only adjusts the mixture and just go on logic it is actually quite easy to set up.

As long as one is careful the distributor is a very simple device.

Logic dictates that the plunger must be just closed when at its lowest point in order to be closed when the engine is off or fuel would flood the intakes when at rest as soon as the pumps ran but the slits must open as soon as the roller touches for the engine to tick over, this is a simple matter of fine measurement so one can set the base plug correctly.

Just in case anyone is feeling brave here is a blow by blow account.

1. Remove distributor, there are three screws and one is hiding under the starter injector outlet so that has to be removed,
2. Remove complete assembly and remove EHA, careful not to loose the two ‘O’ rings.
3. Stuff the openings in the distributor with paper and completely clean the assembly.
4. Carefully strip and clean all parts. Remove the plunger base plug, plunger and plunger spring.
5. Undo the tab washer and nut (19mm)
6. Remove the eight base screws, very carefully pry the two halves apart, the diaphragm will be attached to both top and bottom so gently persuade it to part company with the top half as you go. Careful not to loose any pf the parts inside.
7. Remove the eight springs, four spring seats and four ceramic discs before you loose them.
8. Remove the ‘O’ rings from the slits and springy oval inserts.
9. Continue to carefully remove the diaphragm from the base. Don’t loose the thin red fibre washer on the centre above the filer collar.
10. Place the threaded part of the centre on wood and press the base down to release the centre, remove centre.

Clean everything, blow out passages and check for breakages. Carefully remove and clean the four tiny filters in the top half in the injector line outlets, these look like little alloy washers from above. I personally found the easy way was to gently insert a small, thin self tap screw and pull.

Reassembly;

1. Check that the filter screen is located central to the lower chamber recess and holes and the steel clips are correctly secured around top and bottom.
2. Check the ‘O’ rings and then fit the centre assembly into the base, there is a small ‘nick’ in the threaded part and a line on the base, these line up, fit the tab washer and nut underneath and tighten (19mm), lock over tab washer.
3. Place the thin red washer over the tube onto the top of the filter.
4. Put the small ‘hats’ in the four lower chamber bases followed by the four small springs.
5. Place the diaphragm over the base, steel valves facing down, resting on the springs; it is symmetrical so any way around.
6. Insert the four oval spring inserts into the slits and then after checking, the four ‘O’ rings.
7. Sit the large soft springs onto the ceramic discs and sit the discs into the recesses in the diaphragm.
8. Carefully lining up the fuel passage and the three screw hols to each other, lower the top half onto the lower assembly, making sure the ‘O’ rings around the slits are still correctly located and not getting nicked.
9. Holding the whole thing together insert the eight base screws and tighten evenly.
10. Insert the plunger spring and plunger.
11. Fit the plunger retaining collar to the correct depth but never screw it right in. This is determined by careful measurement of the plunger and centre when apart.
12. Fit the EHA ‘O’ rings and EHA
13. Fit large ‘O’ ring to base and install.
14. Adjust air flap to give 1mm clearance before the roller touches the pin under pressure. This is a safe starting point.
 
OP
U

ukhozi

Active Member
Joined
Feb 13, 2009
Messages
35
Reaction score
0
Location
Estepona, Spain
Website
ukhozi.page.tl
Your Mercedes
1987 2.3-16v, 2001 A170 (W168) Elegance TDi Auto, Eagle SS /VW kit, 1999 Suzuki AN400
  • Thread Starter
  • Thread starter
  • #27
Anyone got a spare 0438 161 006 fuel pressure regulator cheap?
 
H

HRob

Guest
Adjust air flap 2.3 16v cossie.Help needed.

How do you adjust the air flap to 1mm?
 

Alex Crow

Senior Member
Joined
Jul 9, 2009
Messages
10,677
Reaction score
47
Location
Super Suffolk
Your Mercedes
W169, W124, w202, W203, KTM 250 EXC, VW T25 camper and a Polo in a pear tree
more to the point, why do you?

i have never needed to do this adjustment, and it will make no difference to the running of the car. if you look closely at the flap body next to the mixture adjustment there is a tiny pin, almost flush with the flap body. this pin is the stop for the rest position of the flap, which is what i think you are reffering to. if the flap is too high at rest, this pin is supposed to be punched in - carefully!! if the flap is too low at rest then the whole body needs taking apart to punch it upwards.

now rob, if you need help, you could start with a bit about yourself, what the problem is, and finish of with 'thanks' - that sort of thing works well around these parts.

thanks ;)
 
OP
U

ukhozi

Active Member
Joined
Feb 13, 2009
Messages
35
Reaction score
0
Location
Estepona, Spain
Website
ukhozi.page.tl
Your Mercedes
1987 2.3-16v, 2001 A170 (W168) Elegance TDi Auto, Eagle SS /VW kit, 1999 Suzuki AN400
  • Thread Starter
  • Thread starter
  • #30
Got a FPR from Mercman in Cornwall, very nice guys with a shed FULL of Mercedes parts and chopped up bits of them.:D
Ever heard of "No good deed goes unpunished"?:mad:
Well I was parked next to a new-ish jaguar XJ and it had a flat battery so I offered a jump start, I connected my leads to my battery and started the car and then the MUPPET in the Jag connected his end THE WRONG WAY AROUND! :twisted:good cloud of smoke before I could rip the cable off of his car but now the EHV doesn't work but everything else does so car is dead again.
I think it must have cooked the ECU (006 545 42 32, Bosch 0 280 800 236) and the search for an economical replacement is on, seem to vary from $30 to $200 on flea bay, can't find the burnt wire so I guess it is under the fuse box, only place where smoke would make it out of the scuttle in front of the windscreen and inside the car.
The mission continues, I will get it running, one day and it seems I have to do it myself as there seems to be a shortage of real mechanics, you know 'old school' who know their cars without a ****** computer, I am SOOO fed up with head scratches and chin strokers trying to get me to put the car in for repair when it is obvious they have less idea than I do. :confused:
 
Last edited:

d:class automotive are specialists in automotive interiors and upholstery. From Mercedes and modern cars to custom and classics. Tel: 01483 722923 Email:info@dclass.co.ukWeb:www.dclass.co.uk
Top Bottom