Lexman8
Senior Member
- Joined
- May 14, 2013
- Messages
- 882
- Reaction score
- 2
- Location
- Yorkshire, The French Alps & Quahog
- Your Mercedes
- CL500 (2001): Distronic, Bose, Keyless Go; Honda CR-V EX (2011)
Since getting this car, the light output on dipped has been very poor, leading to dull and uneven illumination of the road. I restored the headlamps' lenses with a 3M kit which made them look much better but didn't increase light output by much. Also, since one of the bulbs was slightly pink I decided it was time to change them. The 2 bulbs I bought are Philips D2S 4300k.
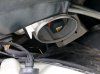
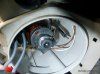
On my CL (W215) the rear of the headlight unit is fairly accessible so it was a simple matter of unclipping the grey cover from the rear of the bi-xenon unit to get access to the bulb assembly, see pic 1. The first thing you see is the igniter unit with the yellow electrical hazard warning. Remove this from the base of the bulb by rotating it slightly anti-clockwise and then gently pulling it straight back. Move it one side out of the way. This reveals the base of the bulb which is still held in place by the black knurled ring around it, see pic 2. The bulb is released by rotating the black ring anticlockwise until you feel it is free. It needs to rotate further than the igniter did for removal. Again, once it's free, remove it completely by gently pulling it straight back. Note that the bulb is then completely free and will probably fall out.
Be careful handling the new bulb. Do not touch the glass or electrode and make sure you don't hit it against anything in the confined space as you fit it.
Fitting the new bulb is the reverse of the above but note that the bulb must sit properly in the projector assembly by locating the cutouts on the plastic collar of the bulb into corresponding lugs in the projector assembly. The next bit is slightly tricky as you need 2 hands where there's only space for one. So whilst keeping the bulb properly located (it'll tend to fall out) place the black ring over the bulb base and fix it to the main assembly by rotating it clockwise. Note that the ring will only pass over the base of the bulb if it's orientated correctly to pass over the 2 pins on the bulb base that (subsequently) hold the igniter. It's pretty obvious if you look at it all before trying to fit it. Also, there is a point on the ring marked 'top' although on mine it was a bit off the top when fully in place. [You could try passing the ring over the bulb base before fitting it but I couldn't get the bulb to locate properly doing it that way.]
Once you are certain that the bulb is located correcly, and fully secured by the black ring, reconnect the igniter and replace the cover. It took me about 15 mins to do the first one but only 5 mins for the other one. Both worked immediately first time.
Now, strangely, one of the new ones is very slightly warmer than the other and it's the o/s one where the old bulb was pink. Co-incidence or what?
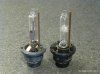
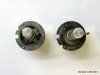
Looking at pic 3 you can probably see why the light output was poor from both bulbs. The left hand bulb in the pic is a D2R, the wrong bulb! Because D2R's are meant for reflector headlamps it has extra shielding to minimise glare, but in a projector headlight I guess it reduces the amount of light output. Also, because of the different locating lug positions, see pic 4, I wonder whether it was ever seated properly. The other bulb (was the pinkish one) clearly has an opaque area around the actual discharge point.
Can't wait until it's dark to try them out!
I guess the procedure will be similar for other Mercs.
Finally (phew!) in pic 2, at the 2 o'clock postion from the bulb, you can see the lever for converting the headlamp to right hand traffic. I don't know it it rotates, moves or what and wasn't going to push my luck by trying it.
----WARNING----
HIDs operate at a high voltage
Follow the relevant safety instructions before carrying out any work! On my CL (W215) the rear of the headlight unit is fairly accessible so it was a simple matter of unclipping the grey cover from the rear of the bi-xenon unit to get access to the bulb assembly, see pic 1. The first thing you see is the igniter unit with the yellow electrical hazard warning. Remove this from the base of the bulb by rotating it slightly anti-clockwise and then gently pulling it straight back. Move it one side out of the way. This reveals the base of the bulb which is still held in place by the black knurled ring around it, see pic 2. The bulb is released by rotating the black ring anticlockwise until you feel it is free. It needs to rotate further than the igniter did for removal. Again, once it's free, remove it completely by gently pulling it straight back. Note that the bulb is then completely free and will probably fall out.
Be careful handling the new bulb. Do not touch the glass or electrode and make sure you don't hit it against anything in the confined space as you fit it.
Fitting the new bulb is the reverse of the above but note that the bulb must sit properly in the projector assembly by locating the cutouts on the plastic collar of the bulb into corresponding lugs in the projector assembly. The next bit is slightly tricky as you need 2 hands where there's only space for one. So whilst keeping the bulb properly located (it'll tend to fall out) place the black ring over the bulb base and fix it to the main assembly by rotating it clockwise. Note that the ring will only pass over the base of the bulb if it's orientated correctly to pass over the 2 pins on the bulb base that (subsequently) hold the igniter. It's pretty obvious if you look at it all before trying to fit it. Also, there is a point on the ring marked 'top' although on mine it was a bit off the top when fully in place. [You could try passing the ring over the bulb base before fitting it but I couldn't get the bulb to locate properly doing it that way.]
Once you are certain that the bulb is located correcly, and fully secured by the black ring, reconnect the igniter and replace the cover. It took me about 15 mins to do the first one but only 5 mins for the other one. Both worked immediately first time.
Now, strangely, one of the new ones is very slightly warmer than the other and it's the o/s one where the old bulb was pink. Co-incidence or what?
Looking at pic 3 you can probably see why the light output was poor from both bulbs. The left hand bulb in the pic is a D2R, the wrong bulb! Because D2R's are meant for reflector headlamps it has extra shielding to minimise glare, but in a projector headlight I guess it reduces the amount of light output. Also, because of the different locating lug positions, see pic 4, I wonder whether it was ever seated properly. The other bulb (was the pinkish one) clearly has an opaque area around the actual discharge point.
Can't wait until it's dark to try them out!
I guess the procedure will be similar for other Mercs.
Finally (phew!) in pic 2, at the 2 o'clock postion from the bulb, you can see the lever for converting the headlamp to right hand traffic. I don't know it it rotates, moves or what and wasn't going to push my luck by trying it.