steveatpipex
Member
- Joined
- Apr 18, 2003
- Messages
- 19
- Reaction score
- 0
This post is to help people who may be having problems with factory fitted xenon lights and is based on my experience and advice from various people on this forum but all pulled togther. My particular thanks to television who made all this possible and I still have the old unit as promised if you want to contact me! Hopefully this post will help anybody with a similar problem sort it out quickly and painlessly!
Although this is based on my 2005 55plate CLK (W209) some of it will be applicable to other models. Before I begin I am assuming that you know how to jack a car up and chock it to work safely – if you don’t, stop reading now and get your plastic out and keep reminding yourself why you got a merc and it’s worth it – it will make you feel better about how much you are going to have to spend having a light fixed by the dealer!
Xenons work differently to ordinary bulbs and they need a Ballast and an Ignitor to make them work. These are electronic parts and on the CLK the ballast is a small aluminium box fastened to the underside of each light unit. The ignitor is integral to the light unit and is a red socket fastened to the rear of the bulb. Tools required – 10mm socket, torch, hand mirror, torsion driver or small flat screwdriver may work.
Ok, the symptoms – my drivers side xenon started to go on and off randomly (when the lights were switched on). To identify the problem (ballast or bulb) I swapped the bulbs over and sure enough the fault followed the bulb. These bulbs can be expensive if you buy OEM (£65 to £120). I decided to hit eBay and sure enough found a pair at £30 delivered. Some might say the cheap lamps will not last but the original factory fit lasted just over 3 years so not much recommendation there! You will need 4300k temp and they are D2S bulbs for factory fit. Although they sell higher temp (and brighter) 4300 is original spec and is will not attract attention from the boys in blue.
Replacing the bulbs. Open and secure the bonnet. Starting with the passenger side on the rear of the light unti you will see a black plastic cover that turns slightly and pulls away exposing the ignitor. Half turn the ignitor and gently pull it from the rear of the bulb. The bulb is held in place by two spring clips, unclip them and remove the bulb noting what way up it is. Check the base of the replacement bulb you will see a central pin with a rubber bung around it. This MUST be seated correctly before you install it. Replace the bulb with a new one carefully – it has notches cut out which match the holder but you will need to use the torch and mirror to make sure it is seated correctly. Use only light pressure – any force may damage the bulb. When you are sure the bulb is seated correctly, refasten the clips, again checking with the mirror. Carefully push the ignitor into place and half turn. BE CAREFUL – it is very fragile – if it does not lock correctly around the pins on the bulb, the rubber bung has become unseated and you will have to remove the bulb, reseat the rubber bung and try again. The ignitor just clicks into place when everything is correct.
Repeat for the drivers side but this one is more fiddly. Replace both plastic covers and switch the lights on. If they work, all well and good you’ve saved a lot of money by doing it yourself.
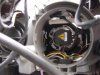
Now, the ballast. On mine at this point they lights worked for 1 mile, then the drivers side went out totally. To access the drivers side ballast jack and chock the car and remove the front drivers side wheel. You will see the inner wheel arch made up of three plastic covers. You need to remove the front and middle covers. They are held in place by some 10mm screws (metal) and 10mm nuts (plastic) and some click pins. All can be easily removed, and wriggle the plastic inner wheel arches out. You will be able to see the light unit and the ballast screwed to the underneath it is removed by the torsion driver (3 torsion bolts) or if you are lucky the small flat screwdriver will fit. Unscrew the 3 bolts and put them somewhere safe. The ballast will come away with a light pull.
To test it, you need to repeat with the passenger side wheel. Its the same process but because the washer bottle blocks access to the light unit you need to remove the light unit totally. This can only be done by loosening the front bumper bar on the passenger side. There are a number of visible bolts that you unfasten, a slider underneath the wheelarch connecting the bumper to the body (it unclips easily) and a hard to see bolt behind the front grille which you can gain access to by pulling the grille away slightly. (PM me for clarity if you are doing this).
Once this is all loosened there is a bolt to unfasten on the light unit and then the light unit can be removed by wriggling it up, forward and out. Swap over the Ballasts, reconnect the wires on the passenger light unit (no need to reinstall at this point) and see what happens. If the fault follows the ballast then it is bust and needs replacing. If not, it may be the ignitor that is broken and you will need a new light unit with integral ignitor (Probably big money or a breakers if you are lucky)
You will find the ballast to be around £300 plus at a merc dealer or the self same part at Bosch is £127 if they have any (Bosch part number 1 307 329 072). My local B
osch dealer said there was none in the country so I hit ebay again. I tracked a brand new Bosch unit down to Germany using a seller called S-cottbus. It was £115 delivered and was here in 2 days.
I put it on the car and so far so good, everything well!
A little time and effort saved me a small fortune. Total cost to me was £145 as opposed to a quote of around £800 at my merc dealer. Good luck! PM me if you want to know any more about this job, I’ll be happy to help as I can.
Although this is based on my 2005 55plate CLK (W209) some of it will be applicable to other models. Before I begin I am assuming that you know how to jack a car up and chock it to work safely – if you don’t, stop reading now and get your plastic out and keep reminding yourself why you got a merc and it’s worth it – it will make you feel better about how much you are going to have to spend having a light fixed by the dealer!
Xenons work differently to ordinary bulbs and they need a Ballast and an Ignitor to make them work. These are electronic parts and on the CLK the ballast is a small aluminium box fastened to the underside of each light unit. The ignitor is integral to the light unit and is a red socket fastened to the rear of the bulb. Tools required – 10mm socket, torch, hand mirror, torsion driver or small flat screwdriver may work.
Ok, the symptoms – my drivers side xenon started to go on and off randomly (when the lights were switched on). To identify the problem (ballast or bulb) I swapped the bulbs over and sure enough the fault followed the bulb. These bulbs can be expensive if you buy OEM (£65 to £120). I decided to hit eBay and sure enough found a pair at £30 delivered. Some might say the cheap lamps will not last but the original factory fit lasted just over 3 years so not much recommendation there! You will need 4300k temp and they are D2S bulbs for factory fit. Although they sell higher temp (and brighter) 4300 is original spec and is will not attract attention from the boys in blue.
Replacing the bulbs. Open and secure the bonnet. Starting with the passenger side on the rear of the light unti you will see a black plastic cover that turns slightly and pulls away exposing the ignitor. Half turn the ignitor and gently pull it from the rear of the bulb. The bulb is held in place by two spring clips, unclip them and remove the bulb noting what way up it is. Check the base of the replacement bulb you will see a central pin with a rubber bung around it. This MUST be seated correctly before you install it. Replace the bulb with a new one carefully – it has notches cut out which match the holder but you will need to use the torch and mirror to make sure it is seated correctly. Use only light pressure – any force may damage the bulb. When you are sure the bulb is seated correctly, refasten the clips, again checking with the mirror. Carefully push the ignitor into place and half turn. BE CAREFUL – it is very fragile – if it does not lock correctly around the pins on the bulb, the rubber bung has become unseated and you will have to remove the bulb, reseat the rubber bung and try again. The ignitor just clicks into place when everything is correct.
Repeat for the drivers side but this one is more fiddly. Replace both plastic covers and switch the lights on. If they work, all well and good you’ve saved a lot of money by doing it yourself.
Now, the ballast. On mine at this point they lights worked for 1 mile, then the drivers side went out totally. To access the drivers side ballast jack and chock the car and remove the front drivers side wheel. You will see the inner wheel arch made up of three plastic covers. You need to remove the front and middle covers. They are held in place by some 10mm screws (metal) and 10mm nuts (plastic) and some click pins. All can be easily removed, and wriggle the plastic inner wheel arches out. You will be able to see the light unit and the ballast screwed to the underneath it is removed by the torsion driver (3 torsion bolts) or if you are lucky the small flat screwdriver will fit. Unscrew the 3 bolts and put them somewhere safe. The ballast will come away with a light pull.
To test it, you need to repeat with the passenger side wheel. Its the same process but because the washer bottle blocks access to the light unit you need to remove the light unit totally. This can only be done by loosening the front bumper bar on the passenger side. There are a number of visible bolts that you unfasten, a slider underneath the wheelarch connecting the bumper to the body (it unclips easily) and a hard to see bolt behind the front grille which you can gain access to by pulling the grille away slightly. (PM me for clarity if you are doing this).
Once this is all loosened there is a bolt to unfasten on the light unit and then the light unit can be removed by wriggling it up, forward and out. Swap over the Ballasts, reconnect the wires on the passenger light unit (no need to reinstall at this point) and see what happens. If the fault follows the ballast then it is bust and needs replacing. If not, it may be the ignitor that is broken and you will need a new light unit with integral ignitor (Probably big money or a breakers if you are lucky)
You will find the ballast to be around £300 plus at a merc dealer or the self same part at Bosch is £127 if they have any (Bosch part number 1 307 329 072). My local B
osch dealer said there was none in the country so I hit ebay again. I tracked a brand new Bosch unit down to Germany using a seller called S-cottbus. It was £115 delivered and was here in 2 days.
I put it on the car and so far so good, everything well!
A little time and effort saved me a small fortune. Total cost to me was £145 as opposed to a quote of around £800 at my merc dealer. Good luck! PM me if you want to know any more about this job, I’ll be happy to help as I can.
Attachments
-
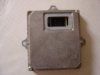 Ballast.JPG9.2 KB · Views: 395
 -
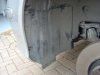 passenger side front inner wheelarch.JPG14.9 KB · Views: 393
 -
 driver side light from inner wheel arch.JPG18.8 KB · Views: 419
 -
 rear view of light showing ignitor in place.JPG18 KB · Views: 449
 -
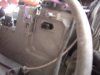 underneath of light unit showing socket for ballast.JPG13 KB · Views: 417
