Submariner1
Senior Member
- Joined
- Sep 3, 2016
- Messages
- 4,692
- Reaction score
- 788
- Location
- Windsor Berkshire
- Your Mercedes
- CL500 2009 5.5
After slapping the tweeter, the Amp worked for 9 days ... then 
Took it for a Star Check ... even whilst broken ... no fault codes :-/
I decided to try and see if BBA reman can fix it, and sods law its working perfectly again.
They suggested its better to have it when broken. So I decided to wait till it failed again.
The as it was a sunny day thought I would see if the car had been leaking into the rear left wing.
Also thought it might be useful to other to see how its fixed in.
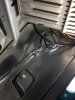
This is what I found ... imo a pretty clean, bone dry amplifier. The reflection in the mirror on the bottom, imo shows no evidence of water marks or corrosion.

No evidence on the top edge (by the wiring plugs) of rust or anywhere else on the Amp.

A sticker glue mark, where it had fallen off, looked like heat or moisture or both had detached it?
Unfortuneately I didn't find the sticker, until I had sprayed silicone oil over the internal bodywork it had slid down the side. Looks like heat crinkle marks on it

Unlike the Amplifier below, on eBay for £800!, which imo looks like rusted old toast! I don't think I would pay £30 for this one. See below eBay offering.

My inner left wheel arch see below

On this Aluminium floot plate see above there were 3 small areas (circled in red) that looked like very light aluminium surface corrosion) but no evidence of water staining or rust. The indented square holes revealed perfectly clean silver painted bodywork?.
The black vents on the left opened and shut properly, even in light wind. Its as though they vent into the space between the wheel liner and the wing inner bodywork. Surprisingly all dry.
But I would be very cautious about underbody powerwashing!
Wouldn't be my amp. location choice, I would vent it into the boot. :-/ but then I didnt see any evidence of water ingress so maybe they do know what they are doing.
No rust on securing brackets or lower amp casing. Clean floor in wheel arch. See the reflection in mirror

The only possible corrosion on the Amp, might be this stuff on the Fan Cover intake swirled supports.
I am not sure if this is Aluminium corrosion, or built up dust and grime on these arms.
It will be easier to tell once its off the car. Looking inside the fan (with difficulty) it looked clean.

Photo of the bottom edge of Amp, imo no evidence of the dreaded water marks dripping down.

Q.1 What are the thick and thin black cables? FM and AM Ariel leads?
Q.2 I assume the black and the yellow connector blocks come out of the amp by pressing the securing clip on the connector blocks and just pulling on the connector block?
Q. Those 2 yellow-orange (sleeved in light red) cables, are they, the MOST Fibre optic leads?, shrouded with red gel holed sleeving?

Q3. I assume the Black Star headed Set bolt, highlighted in Red undoes the frame?
And am puzzled what this black plastic item denoted in blue is? Is it just some kind of plug in cable tie holder?
Interested if you guys think this Amplifier Looks water damaged, in normal or worse than normal condition for 42,000 miles?
Anyway I hope this thread my be of use to anyone with an Amp. Problem.
Lets face it if you have a HK ... its only a matter of time
I might continue to take out the amp, especially if it fails again.
Of course if these black vents on the side let in water (or pressure washer spray) or even moist air ... it looks like the Amplifier fan will pull moisture laden air over the Amp mother board.
Hmmmm, yes I will say it.
Was this designed to fail .. or did they subcontract this concept to a bunch of retards.
Surely it would have been better to put up a couple of rails on the boot backwall and a nice 80 mm diam brushless fan pulling in air from the boot.
To remove left arch liner.
1. Remove Flat floor .. 2 plastic net securing hooks each shroud a T20 screw.
2. Remove under moulded tool tray / lower deck floor. Lift out note 2 small pull out clips at back.
3. Remove left securing front hook with a T20 hook
4. Remove by unclipping left wire racking for side netting , then pull out the metal frame
5. Remove 2 T clips on rear plastic panel, then lever it up vertically.
6. Then, Pull out left wheel arch trim, starting at left rear section, removing left boot lamp holder
Note you can leave in the boot roof and the rear boot vertical panel
Took it for a Star Check ... even whilst broken ... no fault codes :-/
I decided to try and see if BBA reman can fix it, and sods law its working perfectly again.
They suggested its better to have it when broken. So I decided to wait till it failed again.
The as it was a sunny day thought I would see if the car had been leaking into the rear left wing.
Also thought it might be useful to other to see how its fixed in.
This is what I found ... imo a pretty clean, bone dry amplifier. The reflection in the mirror on the bottom, imo shows no evidence of water marks or corrosion.
No evidence on the top edge (by the wiring plugs) of rust or anywhere else on the Amp.
A sticker glue mark, where it had fallen off, looked like heat or moisture or both had detached it?
Unfortuneately I didn't find the sticker, until I had sprayed silicone oil over the internal bodywork it had slid down the side. Looks like heat crinkle marks on it
Unlike the Amplifier below, on eBay for £800!, which imo looks like rusted old toast! I don't think I would pay £30 for this one. See below eBay offering.
My inner left wheel arch see below
On this Aluminium floot plate see above there were 3 small areas (circled in red) that looked like very light aluminium surface corrosion) but no evidence of water staining or rust. The indented square holes revealed perfectly clean silver painted bodywork?.
The black vents on the left opened and shut properly, even in light wind. Its as though they vent into the space between the wheel liner and the wing inner bodywork. Surprisingly all dry.
But I would be very cautious about underbody powerwashing!
Wouldn't be my amp. location choice, I would vent it into the boot. :-/ but then I didnt see any evidence of water ingress so maybe they do know what they are doing.
No rust on securing brackets or lower amp casing. Clean floor in wheel arch. See the reflection in mirror
The only possible corrosion on the Amp, might be this stuff on the Fan Cover intake swirled supports.
I am not sure if this is Aluminium corrosion, or built up dust and grime on these arms.
It will be easier to tell once its off the car. Looking inside the fan (with difficulty) it looked clean.
Photo of the bottom edge of Amp, imo no evidence of the dreaded water marks dripping down.
Q.1 What are the thick and thin black cables? FM and AM Ariel leads?
Q.2 I assume the black and the yellow connector blocks come out of the amp by pressing the securing clip on the connector blocks and just pulling on the connector block?
Q. Those 2 yellow-orange (sleeved in light red) cables, are they, the MOST Fibre optic leads?, shrouded with red gel holed sleeving?
Q3. I assume the Black Star headed Set bolt, highlighted in Red undoes the frame?
And am puzzled what this black plastic item denoted in blue is? Is it just some kind of plug in cable tie holder?
Interested if you guys think this Amplifier Looks water damaged, in normal or worse than normal condition for 42,000 miles?
Anyway I hope this thread my be of use to anyone with an Amp. Problem.
Lets face it if you have a HK ... its only a matter of time
I might continue to take out the amp, especially if it fails again.
Of course if these black vents on the side let in water (or pressure washer spray) or even moist air ... it looks like the Amplifier fan will pull moisture laden air over the Amp mother board.
Hmmmm, yes I will say it.
Was this designed to fail .. or did they subcontract this concept to a bunch of retards.
Surely it would have been better to put up a couple of rails on the boot backwall and a nice 80 mm diam brushless fan pulling in air from the boot.
To remove left arch liner.
1. Remove Flat floor .. 2 plastic net securing hooks each shroud a T20 screw.
2. Remove under moulded tool tray / lower deck floor. Lift out note 2 small pull out clips at back.
3. Remove left securing front hook with a T20 hook
4. Remove by unclipping left wire racking for side netting , then pull out the metal frame
5. Remove 2 T clips on rear plastic panel, then lever it up vertically.
6. Then, Pull out left wheel arch trim, starting at left rear section, removing left boot lamp holder
Note you can leave in the boot roof and the rear boot vertical panel
Attachments
Last edited:


