Repairing the wing mirror indicator on a 211

jberks

Senior Member
Joined
May 12, 2004
Messages
11,153
Reaction score
41
Location
M1, Outside lane, somewhere between Leeds and Lond
Your Mercedes
Jaguar XF 3.0 S, LR Freelander 2, Fiat 500 & Fiat Panda
Firstly, Thanks to Malcolm as always for sending me the details on getting it to pieces. As usual, couldn't have done it without you.

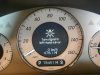
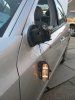
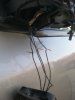
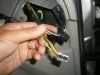
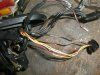
Last week I started getting warnings about the N/S mirror indicator (pic1). Folding the mirror in and out by hand I was able to get it to flash, but once fully out, it didn't. Based on this I assumed a duff wire (mirrors have been on autofold for 4 years) so this is how I fixed it.
However, these instructions also show a strip down so broken glass, broken indicator all go the same way.
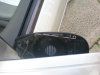
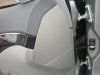
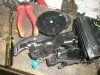
1) Remove glass
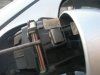
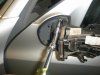
The glass has a spring retaining clip behind (pic2). Angle the glass down and out. You'll just be able to see the top of the inner edge. I followed the spring along and pushed it towards the front of the car until it unclipped and came off. Then jiggle and gently prise the mirror glass off the retaining lugs until it comes free (takes a bit of bravery this bit).
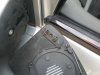
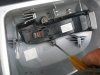
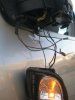
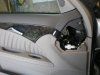
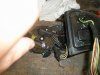
Once free, remove the wires for the heater pic3 (and possibly the dimmer). They're a bit reluctant but they will give. Again jiggle them!
 

Attachments

  • warning.JPG
    warning.JPG
    53 KB · Views: 3,776
  • glass_rtn_sprng.JPG
    glass_rtn_sprng.JPG
    42.5 KB · Views: 5,439
  • heaterwires.JPG
    heaterwires.JPG
    50.5 KB · Views: 4,801
OP
jberks

jberks

Senior Member
Joined
May 12, 2004
Messages
11,153
Reaction score
41
Location
M1, Outside lane, somewhere between Leeds and Lond
Your Mercedes
Jaguar XF 3.0 S, LR Freelander 2, Fiat 500 & Fiat Panda
  • Thread Starter
  • Thread starter
  • #2
Ok - now the glass is off, you can remove the housing. This is held in with a wide clip at the back. It is removed by pushing a screwdriver in from the outside (pic1) and pushing the clip back, whilst pulling on the mirror housing. Its a bit clearer in pic 2 - and you can see some of what you need to getat now the glass is removed.
 

Attachments

  • springclip2.JPG
    springclip2.JPG
    42.8 KB · Views: 5,562
  • clip.JPG
    clip.JPG
    38.3 KB · Views: 5,310
OP
jberks

jberks

Senior Member
Joined
May 12, 2004
Messages
11,153
Reaction score
41
Location
M1, Outside lane, somewhere between Leeds and Lond
Your Mercedes
Jaguar XF 3.0 S, LR Freelander 2, Fiat 500 & Fiat Panda
  • Thread Starter
  • Thread starter
  • #3
The indicator attaches to the wiring by a cleverly positioned connector. As the housing slides on, it connects. To test the indicator I needed some flexibility so prised the connector from the mirror frame and removed the indicator from the outer housing. Its heldin with 2 phillips screws and once removed will peel off
 

Attachments

  • remove_ind1.JPG
    remove_ind1.JPG
    46.3 KB · Views: 4,098
  • remove_ind2.JPG
    remove_ind2.JPG
    41.7 KB · Views: 3,534
OP
jberks

jberks

Senior Member
Joined
May 12, 2004
Messages
11,153
Reaction score
41
Location
M1, Outside lane, somewhere between Leeds and Lond
Your Mercedes
Jaguar XF 3.0 S, LR Freelander 2, Fiat 500 & Fiat Panda
  • Thread Starter
  • Thread starter
  • #4
Now the fun bit. Plugging the indicator back in and waggling the wires around didn't help identify which wire was at fault and I was a bit at a loss. I figured its probably not 12v so a tester isn't going to help, maybe a meter but there's nothing to touch it on to test. I considered giving up and looking into getting a replacement loom but that seems like admitting defeat and I don't like to do that. So, after a bit of head scratching I cut and peeled back the fabric covering on the loom, releasing the 4 wires and threaded the plug back through the mirror frame towards the car, so I had more wire to play with.. Then I got a break, literally. One wire was completely broken, including the insulation and judging by the corrosion on the copper wire, had been poorly for a while.

Feeling smug I cut back the insulation, twisted the wires together and tested. Bingo. It flashed.
 

Attachments

  • 1wire.JPG
    1wire.JPG
    45.4 KB · Views: 2,693
OP
jberks

jberks

Senior Member
Joined
May 12, 2004
Messages
11,153
Reaction score
41
Location
M1, Outside lane, somewhere between Leeds and Lond
Your Mercedes
Jaguar XF 3.0 S, LR Freelander 2, Fiat 500 & Fiat Panda
  • Thread Starter
  • Thread starter
  • #5
I thought I'd do a quick test to ensure that I had got the whole solution and, lo and behold I could still get it to stop by wagging the wires. Bugger.
So, I gently pulled on one of the ok wires and noticed that the insulation started to stretch at one point. Pulling harder I was able to snap it. So I tugged on the remaining 2 and another snapped (if you do this, make sure you know which ends match up to which!). Also, note they all snapped at exactly the same point. As this is clearly a weak spot, It's probable that if yours has gone, it will be at the same point. The 3rd wire seems to be ok for now but given that its probably damaged under the insulation I'm probably going to cut it and repair it anyway.
Connecting the wires up and retested, all appears well now.
Interestingly, when I snapped the 2nd, i was still able to get the unit to flash, so I can only presume that some of the wires are unused.
 

Attachments

  • 3wires_2.JPG
    3wires_2.JPG
    52.1 KB · Views: 2,351
  • 3wires.JPG
    3wires.JPG
    35.4 KB · Views: 2,026

Alex M Grieve

Senior Member
Joined
Apr 28, 2008
Messages
9,388
Reaction score
60
Location
Broom, Warwickshire
Your Mercedes
B Class d200 Sport Premium Plus (66)
Excellent post sir. If anyone ever suffers a traumatic demolition of the mirror (clash of mirrors with a car, or even a stationary object), if you do nothing else, try to retrieve the colour coded cover. The replacement of this, and spraying it to match your paintwork, is by far the most expensive part of the repair. If you have the colour coded cover, watch the repair man's face fall when you ask him to use this rather than furnish one from scratch!
 
OP
jberks

jberks

Senior Member
Joined
May 12, 2004
Messages
11,153
Reaction score
41
Location
M1, Outside lane, somewhere between Leeds and Lond
Your Mercedes
Jaguar XF 3.0 S, LR Freelander 2, Fiat 500 & Fiat Panda
  • Thread Starter
  • Thread starter
  • #7
Good point Alex. My Audi one cost over £250! The second time the Mrs clipped it, I rebuilt all the lugs with superglue and polished out the scratches. To my suprise it looked fine when back on the car.

Anyway, I was going to post something about the repair and rebuild but to be honest it was simply chop out 1" above and below the break, solder in some new wire, seal some heat shrink around the repair - and as they say, reassembly is a reversal of the dismantling instructions.
The only extra think I've learned is refitting the mirror glass.
Looking from the outside, the spring clip wraps around a pin on the right and tucks up under a clip on the left. Leave the left hand side loose until the mirror is fitted, then wind the mirror glass down and in which should allow you to access the clip with a wide screwdriver and drop it down onto its retaining lug.

The other things are
1) Ensure you've put the wiring back onto the centre retaining clip or it will peek out when folded.
2) one plane of movement on the mirror glass is now temperamental (was ok the 1st time I reassembled but not after tidying up the wiring) so it may be that I will need to dismantle again and repair those too. After all, if the indicator wires were shot, its safe to assume the others aren't in great nick either.
3) Parts to repair from Maplin, around £2. (1m of wire and a pack of heat shrink). A tad cheaper than a dealer fix I imagine.
 
OP
jberks

jberks

Senior Member
Joined
May 12, 2004
Messages
11,153
Reaction score
41
Location
M1, Outside lane, somewhere between Leeds and Lond
Your Mercedes
Jaguar XF 3.0 S, LR Freelander 2, Fiat 500 & Fiat Panda
  • Thread Starter
  • Thread starter
  • #8
Addendum

The mirror In/out is not working now and the memory function isn't working. Indicator is working well mind!!
That said, the in/out did jump into life for a few mins and now that I've locked and unlocked the car (mirrors folded) it doesn't again. No whirr, nothing.
So the moral is .......
If the indicator wiring is shot, it shouldn't be a great surprise that the rest isn't far behind and fiddling with one set may just be enough to kill off the others. So, if you fix one set of wires, save yourself some extra aggro and do them all at the same time!!
 

television

Always remembered RIP
Joined
Mar 14, 2005
Messages
164,073
Reaction score
367
Age
89
Location
Daventry
Your Mercedes
2002 SL500, 216 CL500, all fully loaded
Taking the mirror off and working on the bench saves a lot of strain on the wires and components, rather than leaving them hanging down. It is difficult doing the joints outside as well
 
OP
jberks

jberks

Senior Member
Joined
May 12, 2004
Messages
11,153
Reaction score
41
Location
M1, Outside lane, somewhere between Leeds and Lond
Your Mercedes
Jaguar XF 3.0 S, LR Freelander 2, Fiat 500 & Fiat Panda
  • Thread Starter
  • Thread starter
  • #10
Taking the mirror off and working on the bench saves a lot of strain on the wires and components, rather than leaving them hanging down. It is difficult doing the joints outside as well

Absolutely - and if the connector was where you'd logically put it - just inside the door, the other side of the mirror mounting I'd definately do it this way. But, because it requires the door panel to be removed, I find myself very reluctant.

Aside from the potentially 'very expensive' ribbon cable issue I was warned about (which scares the hell out of me), there's the very fact of stripping the door. IME very often, once stripped, the door trim is never quite the same. Creaks and rattles have a nasty tendancy of popping up.

So, I think I'll probably struggle through and fix it in situ and avoid disturbing any more than I have to. As you see from the photos, if you cut the loom cover back, and withdraw the wiring, the break point is easily accessible and whilst I won't be able to splice in as much new wire as I'd like - it avoids any of the risks involved in stripping the door.
 
OP
jberks

jberks

Senior Member
Joined
May 12, 2004
Messages
11,153
Reaction score
41
Location
M1, Outside lane, somewhere between Leeds and Lond
Your Mercedes
Jaguar XF 3.0 S, LR Freelander 2, Fiat 500 & Fiat Panda
  • Thread Starter
  • Thread starter
  • #11
Ok - moving on
Got a couple of free hours this evening so...
Open the door and remove the panel as discussed. (Pic1, 2)
With the panel removed, identify the 2 multiplugs for the mirror and unplug them. Pic3,4
 

Attachments

  • panel.JPG
    panel.JPG
    67.9 KB · Views: 822
  • panel_removed.JPG
    panel_removed.JPG
    62.4 KB · Views: 883
  • plugs_in_situ.JPG
    plugs_in_situ.JPG
    66.2 KB · Views: 925
  • unplugged.JPG
    unplugged.JPG
    67.6 KB · Views: 929
OP
jberks

jberks

Senior Member
Joined
May 12, 2004
Messages
11,153
Reaction score
41
Location
M1, Outside lane, somewhere between Leeds and Lond
Your Mercedes
Jaguar XF 3.0 S, LR Freelander 2, Fiat 500 & Fiat Panda
  • Thread Starter
  • Thread starter
  • #12
Dismantled the mirror glass and housing as previous (really easy - I'm getting an old hand at this now) and manually folded the mirror back in to reveal the screws.
Removed the 3 star screws that hold the mirror to the car and take the mirror housing off the door. (pic)

Now the housing is removed, take it back to the workbench.
I tried to remove the wiring from the frame altogether but the wires are glued through a grommet and I didn't want to disturb it. However, on the bench it is much easier to work on.
I unplugged the motor but the plug is too big to withdraw, so using a smaller star bit I removed the motor (pic)

Took the wiring back as far as I could and then examined it. (pic)
As you can see, they have a rather major kink.
Gently pulling on each wire in turn, it took no effort to break them in 2. I can only assume that they'd broken through. Its quite surprising that any of it worked considering. Anyway, cut each back and soldered in a new piece before heat shrinking to seal it.

All the wires were broken so I did each in turn.
Then tape the looms back together, run the wires back into place and refasten the hinge clip.
 

Attachments

  • remove_mirror1.JPG
    remove_mirror1.JPG
    72.4 KB · Views: 1,010
  • motor_unscrew.JPG
    motor_unscrew.JPG
    76.6 KB · Views: 979
  • kinked.JPG
    kinked.JPG
    61.4 KB · Views: 967
  • one_down.JPG
    one_down.JPG
    114.8 KB · Views: 947
  • wire_back_in.JPG
    wire_back_in.JPG
    125.8 KB · Views: 936
OP
jberks

jberks

Senior Member
Joined
May 12, 2004
Messages
11,153
Reaction score
41
Location
M1, Outside lane, somewhere between Leeds and Lond
Your Mercedes
Jaguar XF 3.0 S, LR Freelander 2, Fiat 500 & Fiat Panda
  • Thread Starter
  • Thread starter
  • #13
All back together.
Reattach the mirror to the car, plug back in and reassemble.
Reprogram the mirror memory if you have. It will be completely confused so don't hit the memory button to reset it, instead, set it correctly for normal and reverse operations and save them as normal.

And thats it. Tested and EVERYTHING now works perfectly. :):):)
 

Alex Crow

Senior Member
Joined
Jul 9, 2009
Messages
10,677
Reaction score
47
Location
Super Suffolk
Your Mercedes
W169, W124, w202, W203, KTM 250 EXC, VW T25 camper and a Polo in a pear tree
that is pretty much how i do them, seems like one a week at the minute. i always fold back and forth a few times to make sure all the wiring is happy, does not get trapped and bends with a nice radius.

i used to pull the wires to see which ones break, but now i just redo them all! with a very fine very multistrand cable, heat shrink and black loom tape.
 

Blobcat

Moderator
Joined
Feb 8, 2006
Messages
38,917
Reaction score
27,646
Location
Grange Moor
Your Mercedes
R171 SLK280, Smart R451, Land Rover 110 County SW, 997 C2S, R1250 GSA TE 40th, CBR600FP
If you wish to discuss this thread pls post replies here
 

WE HAVE NOW MOVED: 8 Hazel Road, Woolston, SO19 7GB
Service, Repairs and remapping service
Any queries, please do not hesitate to contactEmail@mbsofsouthampton.co.ukor alternatively you can phone Colin or Dave on 02380 445820, out of hours numbers are 07787913313 or 07907631681.
Top Bottom