umblecumbuz
Senior Member
- Joined
- Sep 20, 2010
- Messages
- 4,431
- Reaction score
- 1,875
- Location
- Wales and Gozo
- Your Mercedes
- S204 and CLC 204 cdi, MX5, Kia Soul
My 722.6 autobox (W203 220) has been playing up, and after a few weeks research I concluded that it was the conductor plate, so I decided to change it.
After removing the undershields, I drained the gearbox (5mm allen key on a socket - drain plug is tight) and replaced the plug, took off the heatshield protecting the electrical connection from the ECU, then removed the sump (Torx No 30, six bolts - again tight), being careful to hold it level when lowering it as there was still some fluid in the pan.
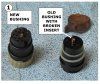
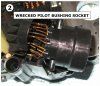
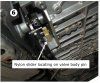
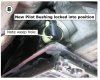
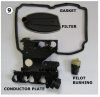
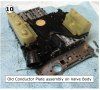
Next, I unclipped the electrical connection (anticlockwise tag on pilot bushing, then it just pulls free) and went to remove the pilot bushing, which required a 7mm socket on an extension. The photos will show the details. And there I hit a snag. I have changed these before without a problem, but this one would not undo. The brass threaded insert that it screws into, which is embedded in the conductor plate inside the gearbox, just rotated with the setscrew. Finally, as I was going to replace all the affected parts, I decided that it had to be broken loose, so I undid the ten bolts holding the valve body (same torx as sump), and forced the body with conductor plate out of the gearbox housing. If this problem ever arises when the intention is just to replace the pilot bushing, it will become a major strip-down job, instead of a £9 replacement! The conductor plate was shot, and you can see where I had to break it to get the whole assembly out of the gearbox. (Pics 1 and 2).
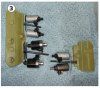
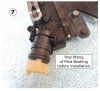
Once on the bench, acting like a surgeon for cleanliness, I removed the solenoids with their retainers, keeping these in strict order so that everything could go back correctly. Then I was able to remove the conductor plate from the valve body by springing two plastic clips, one on either side. With this dismantled, it was easy to check each solenoid by touching each one with 12 volt leads to make sure they ‘clicked’ as they should. (Pic 3).
Everything had to be meticulously cleaned, and I used a copious supply of lint-free cloths, plus an aerosol brake cleaner. Before the solenoids were fitted to the new conductor plate, I made sure that every contact was clean and shiny, without any ‘burn’ marks which would indicate poor connections.
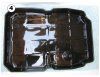
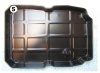
I then cleaned the sump, checking the condition of the fluid as I did so. No traces of metal or dirt of any kind were found (not surprising - the fluid was changed only 10k miles back). There was no magnet in this sump, and the plug was not magnetic either. (Pics 4 and 5).
Continued ...
After removing the undershields, I drained the gearbox (5mm allen key on a socket - drain plug is tight) and replaced the plug, took off the heatshield protecting the electrical connection from the ECU, then removed the sump (Torx No 30, six bolts - again tight), being careful to hold it level when lowering it as there was still some fluid in the pan.
Next, I unclipped the electrical connection (anticlockwise tag on pilot bushing, then it just pulls free) and went to remove the pilot bushing, which required a 7mm socket on an extension. The photos will show the details. And there I hit a snag. I have changed these before without a problem, but this one would not undo. The brass threaded insert that it screws into, which is embedded in the conductor plate inside the gearbox, just rotated with the setscrew. Finally, as I was going to replace all the affected parts, I decided that it had to be broken loose, so I undid the ten bolts holding the valve body (same torx as sump), and forced the body with conductor plate out of the gearbox housing. If this problem ever arises when the intention is just to replace the pilot bushing, it will become a major strip-down job, instead of a £9 replacement! The conductor plate was shot, and you can see where I had to break it to get the whole assembly out of the gearbox. (Pics 1 and 2).
Once on the bench, acting like a surgeon for cleanliness, I removed the solenoids with their retainers, keeping these in strict order so that everything could go back correctly. Then I was able to remove the conductor plate from the valve body by springing two plastic clips, one on either side. With this dismantled, it was easy to check each solenoid by touching each one with 12 volt leads to make sure they ‘clicked’ as they should. (Pic 3).
Everything had to be meticulously cleaned, and I used a copious supply of lint-free cloths, plus an aerosol brake cleaner. Before the solenoids were fitted to the new conductor plate, I made sure that every contact was clean and shiny, without any ‘burn’ marks which would indicate poor connections.
I then cleaned the sump, checking the condition of the fluid as I did so. No traces of metal or dirt of any kind were found (not surprising - the fluid was changed only 10k miles back). There was no magnet in this sump, and the plug was not magnetic either. (Pics 4 and 5).
Continued ...