W210 Sunroof woes and how to cure them

brandwooddixon

Senior Member
Joined
Jul 31, 2006
Messages
3,874
Reaction score
688
Location
Wolverhampton
Your Mercedes
S63 Coupe 2014
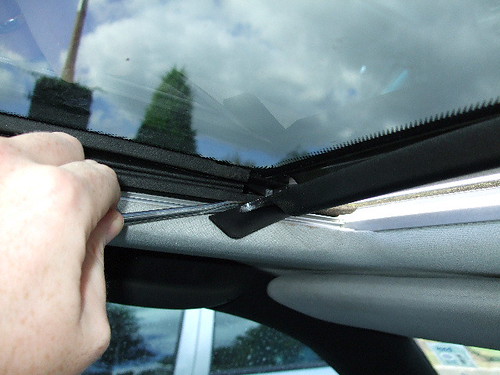
I have a 1998 E430 fitted with an electric tilt and slide sunroof. One day whilst trying to slide the sunroof back it became stuck after moving about 4 inches or so and procedded to make an horrific clacking and thunping noise! I managed to close it again and as my car had automatic climate control fitted anyway I decided to leave it until the next service.

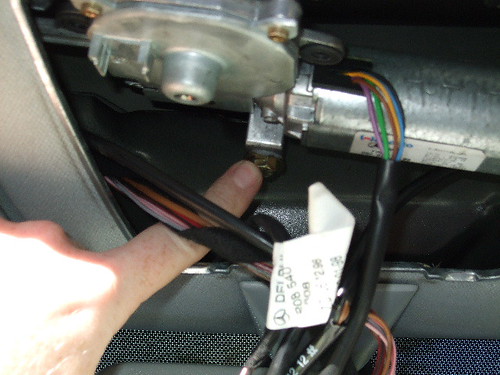
Boy was I in for a shock. MB quoted me £3500 to fit an entirely new sunroof "cassette" and as the cause was down to the flexidrives used to power the sunroof, which MB erfer to as cables (even though they push as well as pull) it wouldn't be covered by the warrenty. So I decided to leave it.

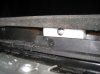
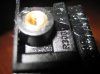
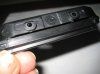
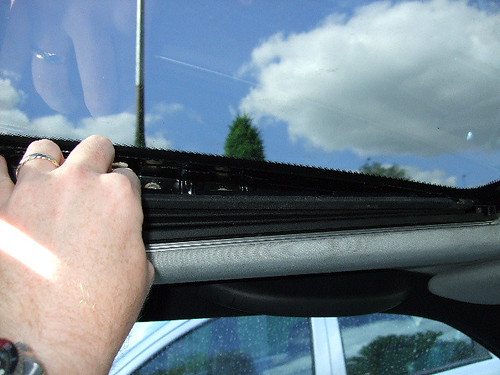
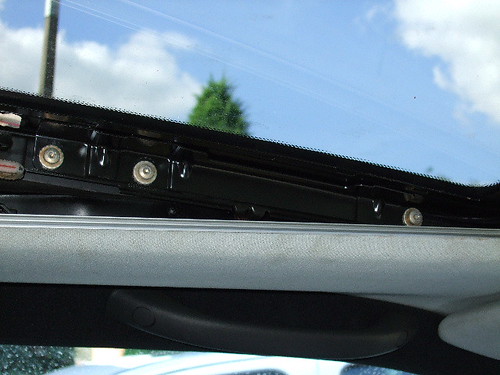
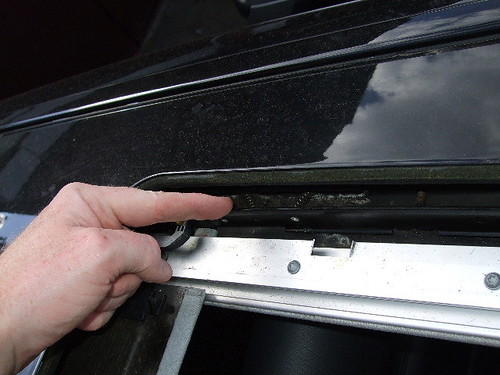
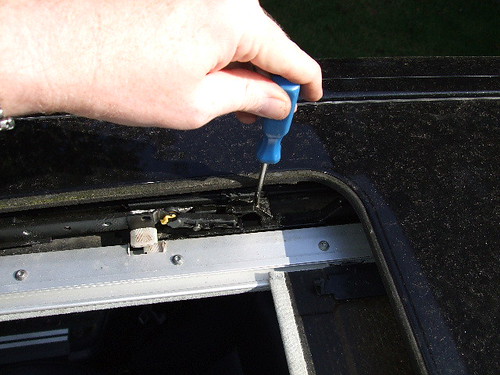
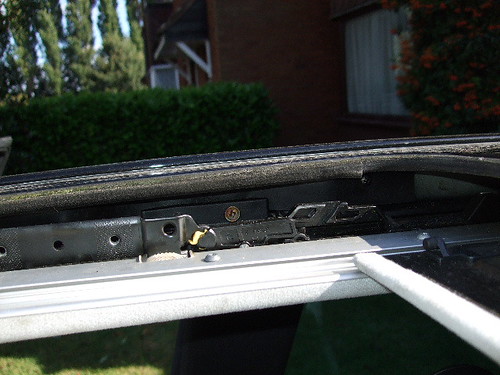
I have since learned that this is a common problem with the W210. Through lack of use the tracks become gummed up, the roof sticks at some point and the drive "cables" buckle, popping out beneath a small plastic cover.

This cover is fixed in place by a self tapping screw at one end. A simple fix is to place another self tapper at the other end. I tried this, but in my case the runners were too gummed and the cable too buckled for it to work.

So I left it.

Until yesterday.

I decided to replace the cables and get my sunroof working. MB dealers wont do this anymore as the work is then under 12 month warrenty and lack of use will have owners returning before the warrenty expires for the work to be performed for free.

All told it took me about 4 hours, but that included taking pictures with my new camera and visiting the local motorfactors for some unexpected bolts - more of that later. I reckon that it should take about 2.5 to 3 hours to do normally.

Here's what you'll need:

New cables : MA210 780 01 89 and MA210 780 00 89 £22.70 each (cables are handed).

Possibly 2xM4 bolts about 8mm long.
T25 Torx screwdriver
10mm socket.
Small phillips screwdriver.
Flat bladed screwdriver or other implement for prising things apart.

Lubricant to regrease the tracks - MB recommend Klueber Polylub GLY801 but only comes in big tins from the dealer. I used some dry setting, teflon bicycle chain, spray lubricant instead. Ultimately it'll attract less dust and dirt.
 
OP
B

brandwooddixon

Senior Member
Joined
Jul 31, 2006
Messages
3,874
Reaction score
688
Location
Wolverhampton
Your Mercedes
S63 Coupe 2014
  • Thread Starter
  • Thread starter
  • #2
Step 1: Remove the glass sunroof panel.

Slide the sunroof open a few inches. Mine would still do this electrically.
Remove the plastic trim along the front edge, by levering it away from the end and pulling it down. Be careful not to break the clips. Try not to rotate it too much.

1392435172_e66cd65989.jpg


Next we need to slide the sunroof closed and tilt it open in order to remove the side belows, one on each side. These simply clip on.

1391541729_c17d167cb6.jpg


Behind these belows we can see the retaining screws for the glass panel. You'll need a T25 Torx bit and there are 3 on each side.

1391541931_72018a88ea.jpg


Once removed you should now be able to remove the glass panel.
 
Last edited:
OP
B

brandwooddixon

Senior Member
Joined
Jul 31, 2006
Messages
3,874
Reaction score
688
Location
Wolverhampton
Your Mercedes
S63 Coupe 2014
  • Thread Starter
  • Thread starter
  • #3
Step 2: Disconnecting the Sunroof motor

On the W210 the sunroof motor is hidden behind the light fitting just in front of the rear view mirror. So we must remove that before we can disconnect the motor.

Gently prise off the two large, light lenses on either side of the fitting. You'll then see that the main fitting simply clips into the headlining. Using a thin bladed screwdriver will allow you to easily release the clips.

1392436938_3e964c9906.jpg


You'll now have exposed the drive motor. Remove the two Torx retaining bolts.

1391543475_a9ff53b658.jpg


And loosen the 10mm nut hiding at the back enough to allow you to gently pull the drive motor down.

1391543695_df4e2f2401.jpg


Just leave the motor hanging on the nut. You should just be able to see the drive cables through a small apeture in the roof.
 
Last edited:
OP
B

brandwooddixon

Senior Member
Joined
Jul 31, 2006
Messages
3,874
Reaction score
688
Location
Wolverhampton
Your Mercedes
S63 Coupe 2014
  • Thread Starter
  • Thread starter
  • #4
Step 3: Removal of the drive cables

If you attempt to move the sunroof back here's typically what you get, as the cables protrude from beneath their covers.

1392435834_27910972cf.jpg


Remove the rear water drain. It clips into the sunroof mechanism on each side.

1392436120_5ecebe921e.jpg


Simply unclip and remove.

1392436728_2b0bf9fa5f.jpg


Unscrew the drive cables from the mechanism using a small phillips screwdriver as shown.

1392437870_c5b7b15c39.jpg


You can now remove the mechanism from the rails, if you wish, which will give you easier access to the removable cable cover - shown here behind the mechanism.

1392438372_f9c30d2100.jpg


Push the mechanism to the rear in order to disengage a side pin from a channel which forces the roof up as it moves forwards. With gentle pressure towrds the opening the front part can be disengaged. Pull the mechanism forwards. It hinges in the middle. Once the front two nylon runners are free you should be able to rotate the others from the aluminium channel by rotating it towards the sunroof opening.

Remove the self tapping screw from the cable cover (positioned towards the rear of the car). And by lifting it and pulling the top towards you (or rather the sunroof apeature) you'll be able to remove it. Incidentally, if there's a second self tapper towards the front of the car then it's bee "fixed" before.

Push the disconnect cable towards the front of the car and pull it out through the gap where the cover was.
 
Last edited:
OP
B

brandwooddixon

Senior Member
Joined
Jul 31, 2006
Messages
3,874
Reaction score
688
Location
Wolverhampton
Your Mercedes
S63 Coupe 2014
  • Thread Starter
  • Thread starter
  • #5
Step 4: General mainenance

With the tilting mechanism remove clean up the nylon bushes.

Clean and relubricate the aluminium channel. I simply reinstalled the mechanism with a J cloth wrapped around a couple of the white nylon guides and worked the mechanism back and forth in it's channel as far as I could make it go, removing the dirt.

I then used the same method, but without the J-cloth to lubricate the channel - squirting the cycle chain lubricant into it in several places first. Double check to make sure that the nylon guides come out clean.
 
OP
B

brandwooddixon

Senior Member
Joined
Jul 31, 2006
Messages
3,874
Reaction score
688
Location
Wolverhampton
Your Mercedes
S63 Coupe 2014
  • Thread Starter
  • Thread starter
  • #6
Step 5: Install new cables and replace the sunroof.

Alright, reinstallation is basically a reversal of all points so far, but here's a few pointers.

1. Be careful when threading the new cables back in not to buckle them. Personally I didn't lubricate them as the old ones didn't appear to be they were just dirty.

2. If there isn't one there already, place a second self tapping screw into the other end of the drive, channel cover. Be careful to use one which is the same length as that already used otherwise it will foul against the roof metalwork and crack what you're fixing the cover to.

3. A thin piece of wood or rubber can be wedged between the top of the cover and the roof if you wish. This will prevent the cover from tilting and allowing the possibility of the cable from the protruding from underneath.

4. MB changed the drive cables at some point and now thay are fixed to the mechanism using M4 screws. Mine were originally fitted with self tappers and so I had to buy some M4 screws and cut them down to length. Use several nuts to protect the threads when cutting and file the end flat when done.

5. Before fitting the motor, pull/push the mechanism into the fully tilted position (on both sides). This is because the flat position is not the sunroof closed position. Push the roof switch as if you were tilting the roof to its fullest extent and wait for the motor to stop. This ensures that the cables and motor are synchronised to the same position.

6. When fitting the glass tighten the Torx scews finger tight to start with. This will allow you to close the roof and then adjust the glass so that the front edge is about 1mm lower than the car roof and the back edge about 1mm higher. Once done tighten them fully.
 
Last edited:
OP
B

brandwooddixon

Senior Member
Joined
Jul 31, 2006
Messages
3,874
Reaction score
688
Location
Wolverhampton
Your Mercedes
S63 Coupe 2014
  • Thread Starter
  • Thread starter
  • #7
There I hope that this is useful to everyone.
In the meantime remember to use all those electrical windows fully at least once a month in order to keep the going.
 

anyweb

Senior Member
Joined
Jul 15, 2005
Messages
3,150
Reaction score
364
Age
57
Location
Sweden
Website
www.niallbrady.com
Your Mercedes
c238,w120 (diesel)
excellent post, thanks and i'll copy it to the DIY section.
cheers
anyweb
 

bigasotonuk

Senior Member
Joined
Nov 14, 2006
Messages
5,331
Reaction score
58
Age
56
Location
Southampton UK
Your Mercedes
C43/55 AMG 1999 / C230K 1997
Hi,
Very good post mate, i,ve always been scared stiff of doing anything to a factory fit sunroof.
 

Nick Buckley

Active Member
Joined
Feb 14, 2007
Messages
27
Reaction score
0
Your Mercedes
W210 1997 E320 Auto Estate
I bought my Nov 1997 W210 320 Estate in July this year. One thing I didn't check was the sunroof. Next day I discovered exactly the same fault you had. It would slide back a few inches & then made the horrible, loud clicking. The dealer (not an MB specialist) took it back and arranged to have it fixed by CarMagic in North Harrow. When I picked it up, CarMagic said they would be charging the dealer £150. The sunroof works perfectly now but I will make a point of operating all the windows & roof regularly.

Great article.

Cheers
 
A

ackers

Guest
I had exactly the same symptoms, only opening a couple of inches, so after reading this I decided to have a look. When I got the glass roof off, I found that the drive channel covers had 2 screws in them. I removed the cover from the side that was causing the problem and it seemed OK, so I put another self tapper in the middle. Refitted the glass (only) and it now opens about 2/3rds of the way before it stops. I think it is failing on the other side, so I will do the same again. Does anybody know the part numbers of the channel covers, they look OK but may be flexing slightly.
 
OP
B

brandwooddixon

Senior Member
Joined
Jul 31, 2006
Messages
3,874
Reaction score
688
Location
Wolverhampton
Your Mercedes
S63 Coupe 2014
  • Thread Starter
  • Thread starter
  • #13
I'm sorry I don't know what the part numbers are, but as you've already had the glass out in order to look at the problem I'd advise you to spray some silicon lubricant into the runner guides.

It sounds as if you've already got the new cable access covers and that someone has had a go at fixing the problem in the past.

If you think that they are allowing the cables to pop out then it is possible to wedge a piece of wood behind then between the covers and the roof.

Ultimately though once the drive cables start to kink they really have to be replaced.
 

Veridian

Senior Member
Joined
May 12, 2006
Messages
119
Reaction score
17
Location
East Devon
Your Mercedes
R230...about to purchase will update shortly
To add my tuppence worth, my sunroof did exactly the same thing last summer - Having not opened it for a few months (oops)- went back 6 inches then graunch..graunch... But following the excellent advise on the forum, I summoned up the courage and took out the roof and replaced the cables myself (£24 a side) Turned out the self tapper had fallen out of one the covers - methink someone had bodged it a few years earlier. Anyway sprayed a load of fancy lithium grease on the cables and screwed back & wedged the guides down with a couple of small pieces of wood. It all works smooooothly now :). Took about 2 hours all in, and saved a load of £££ too.

But deffo worth operatng all the windows & roof once a month... Here Chris, you havent got a spare blower regulator have you? LOL
 
A

ackers

Guest
Just waiting for a reasonable weather forecast and then I will check which side is causing the problem and try the wedge trick, silicon grease is a must. The cables seemed to be OK but the final thing would be to replace them, having said that, what is there to stop the new cables from popping out if the fault lies with the covers.
 
OP
B

brandwooddixon

Senior Member
Joined
Jul 31, 2006
Messages
3,874
Reaction score
688
Location
Wolverhampton
Your Mercedes
S63 Coupe 2014
  • Thread Starter
  • Thread starter
  • #16
There's nothing to stop the new cables kinking other than keeping the slider tracks lubricated.

The problem is that once kinked the cables remain that way and will nearly always pop out under the covers.
 

MBGraham

New Member
Joined
Sep 2, 2009
Messages
8
Reaction score
0
Location
Ontario, Canada
Your Mercedes
'98 E320, '85 300D, '72 350SL 4.5L
Just found this write up. I had been puzzling over the MB videos that make it look so easy!

Absolutely fantastic pictorial - thanks very much for posting!
 

MBGraham

New Member
Joined
Sep 2, 2009
Messages
8
Reaction score
0
Location
Ontario, Canada
Your Mercedes
'98 E320, '85 300D, '72 350SL 4.5L
I was going to modify the 1-screw cover plates, but they are so inexpensive, decided to buy new ones. Don't have them in my hands yet, but apparently MB have modified the covers.

Original numbers 2107840156 and 2107840256 replaced with 2107840456. Latter apparently has two holes.

I have made two blocks out of 1/2" x ~ 5/8" wide polyethylene . There is a screw directly above the cover plates that can be removed (same as cover plate screw you will be needing, so hang on to them.) Once 2-hole coverplates are installed, use ~3/4" screws to install the blocks. The blocks should help, especially if the cover plate screw loosen , as mine had.

I have been looking at lubricants. MB in their videos say not to lube the channels, but elsewhere they say we should ?? They also appear to have two different lubricants, but is not clear where to use which? Considering they are so hard to obtain, I have decided on a product that I know of from sailing. It is called McLube Sailkote and is a Teflon based material that apparently has superior adhesion properties! It is dry and unlike greases won't pick up dirt. It is particularly useful in sailboat aluminum mast tracks so that the plastic sail slides won't bind. Seems like it should work for our tracks too. I think I will spray the cables with the same stuff before installation. (available from marine stores)
 

Attachments

  • IMG_1080.jpg
    IMG_1080.jpg
    268.3 KB · Views: 265
Last edited:

MBGraham

New Member
Joined
Sep 2, 2009
Messages
8
Reaction score
0
Location
Ontario, Canada
Your Mercedes
'98 E320, '85 300D, '72 350SL 4.5L
Just picked up new parts - A couple of pics to show the differences.

One shows the new two hole coverplate part 2107840456 (Which does not come up in the MBUSA epc for my '98 E320)

Other shows the threaded connection instead of self tapper cable attachment. According to original post, I now need two short M4 screws (and will have two more spare self-tappers!)
 

Attachments

  • IMG_1086.jpg
    IMG_1086.jpg
    214.2 KB · Views: 324
  • IMG_1084.jpg
    IMG_1084.jpg
    243.3 KB · Views: 322

MBGraham

New Member
Joined
Sep 2, 2009
Messages
8
Reaction score
0
Location
Ontario, Canada
Your Mercedes
'98 E320, '85 300D, '72 350SL 4.5L
Just finished the job - no problems except a little tricky getting slides back into track.

Thanks again to Brandwooddixon - Couldn't have done this without his great instructions!
 

Comand Online Ltd is a specialist supplier of Mercedes Navigation Disks, Phone & Bluetooth, iPod, DAB, CD and other COMAND retrofit parts to enhance your vehicle.www.comandonline.co.uk
Top Bottom