How to repair bulb failures in the heater panel

Parrot of Doom

Senior Member
Joined
Nov 14, 2005
Messages
2,167
Reaction score
4
Location
Manchester
Your Mercedes
Was an E300TD, now a Lexus LS400
A couple of bulbs had gone, in the heater panel, and the cigarette lighter. Heres how to replace them:

Tools required: 1 small philips screwdriver, 2 thin flat bladed screwdrivers, car radio keys, soldering iron, copper braid, replacement bulbs. If you're no good at soldering, either find a mate who is, or take the heater panel to the nearest TV repair shop. You can drive the car with the panel removed, however hot air will drift through the vents.

1) Remove the panel surrounding the gear lever by pulling upwards from near the oddments/drink holder bin. This is much easier if you put the lever in N, you'll need the keys in the ignition to do this though. Don't worry, the car shouldn't start unless the lever is in P.

242377400_cb096b68e9.jpg


Once removed, you can disconnect the cables if you like but they're long enough that you can pull it over the gear lever and put it to one side.

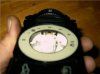
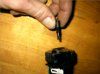
2) Pull the ashtray out (small lever on the right). Look at the bottom of the compartment, behind the gear lever panel you just removed are two small screws. Unscrew them and put them somewhere safe. You can now remove the ashtray/lighter compartment completely. Pull it from the bottom, and gently bring it out. Careful you don't scratch the veneer on anything. Theres a cable on the rear that goes to the cigarette lighter, pull the connector out. The bulb is part of the connector and is in a black housing. Remove the housing from the connector, and then pull the bulb out of the housing. Be aware the bulb needs to go back in with the same orientation.

242377401_9f3001b6d6.jpg


You should probably ignore whats in my passenger footwell :(

242377402_20e501c6f7.jpg


3) Now the ashtray compartment is out, put your hand underneath the sunglasses compartment, right to the back, and reach over the top edge. You'll find a clip, pull down on that clip with your finger, and that will release that compartment. It slides out on rails.

242377405_dd383e6a72.jpg


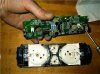
4) Remove your radio. I've left this bit out as mine has different keys. Whatever radio you have, remove it with the keys, unplug everything from the back (take note of what goes where), watch the plugs or the radio don't scratch the veneer.
 
OP
Parrot of Doom

Parrot of Doom

Senior Member
Joined
Nov 14, 2005
Messages
2,167
Reaction score
4
Location
Manchester
Your Mercedes
Was an E300TD, now a Lexus LS400
  • Thread Starter
  • Thread starter
  • #2
5) Once the radio is out, you will see 2 screws holding the fascia in. They're just above where the radio would sit. Unscrew them, and put them somewhere safe. Note, the screws that hold the fascia on are shorter than the ones that hold the ashtray in - don't get them mixed up.

242384029_02de4cdbb9.jpg


The fascia simply pulls away, in a manner not dissimilar to the gear surround:

242377406_5b3dc83663.jpg


The fascia will have a couple of wires going to the back - again, you don't need to disconnect them, theres enough room that the fascia can slide down between the driver's seat and the gear lever. Here are the wires:

242393392_aada460797.jpg


Once the fascia is off, you can see the heater panel completely exposed:

242377407_2709c54fb2.jpg


Now I was quite surprised here. The controls aren't held in by anything other than 2 clips at the front. Possibly someone has been at it before and forgotten to replace something, there are 2 holes, 1 in each corner, that look perfect for screws. I couldn't see any receptacles though.

Please make sure you note the position of the air direction control at this point

6) Remove the heater panel - this is quite easy, just put your thumb on each clip (top left and right), and pull the panel out. Theres a large connector on the back with a gray retaining clip. Rotate the clip, and remove the connector. Its a very neat design this bit, I was impressed :)

242393399_4417b1295e.jpg


242393385_d3d8555ede.jpg
 
OP
Parrot of Doom

Parrot of Doom

Senior Member
Joined
Nov 14, 2005
Messages
2,167
Reaction score
4
Location
Manchester
Your Mercedes
Was an E300TD, now a Lexus LS400
  • Thread Starter
  • Thread starter
  • #3
When the panel is removed, you'll notice two big yellow 'sticks' poking out the back of it. These are the air direction controls, so don't mess around with them or you'll end up sending air to your feet when you really want it to the windscreen!

Take the panel out of the car, and head inside for a brew. The panel splits quite easily, there are numerous plastic clips around the circumference, just get the flat bladed screwdrivers in there and prise it apart:

242384042_6aaf9a3a4a.jpg


242384041_9720924b00.jpg


At the back of the panel is the air direction control - you can see a small hole for alignment at the bottom:

242384037_4ca61daa3b.jpg


You'll also see a small 'arrow' on the stalk, use that to double check that the control is aligned correctly.

Now I thought a couple of bulbs needed doing. One for the air direction control, and another for the recirculate button. But it turns out that inside the panel the light is refracted around inside plastic light guides, and only 1 bulb had actually blown. Unfortunately, the only way to get to that bulb that I could see is to remove the PCB. In another bit of poor design, the only way to remove the PCB is to unsolder the heating controls from either end of the board.

242384035_1c62ff9dda.jpg


Anyway, only one bulb had gone, so I just desoldered the right hand heating control, bent the PCB a little (see above), and grabbed the bulb from its socket (at least its socketed, other manufacturers would solder it directly onto the PCB!) You'll definitely need desoldering braid, or you'll ruin both the PCB and the heater control pins.

The bulbs at the back of this are tiny little 12V 1.2W jobbies, I bought a couple from the nearest Merc parts desk. They're less than a quid each which I thought was acceptable. I bet you could get them from RS for 10p but you'd have to find them first.

242384033_ce3743d1ee.jpg


So, put the new bulb in, push the PCB back together, solder the heating control pins back in, snap it all back together, and reassemble in the exact opposite way to that described above. The most difficult bit will be getting the two yellow stalks on the back of the heater panel, into their receptacles. Persevere, they came out, they'll go back in!

Job done.
 

Dosco

Senior Member
Joined
Nov 14, 2006
Messages
3,942
Reaction score
5
Age
83
Your Mercedes
W211
Excelled once more P. My fan speed control does not always shut off, if I tap it with my knuckle it cycles between on/off so I am assuming the control is faulty, is that assumption right and if so would it be a simple job to replace the rotary control following your article?
 

anyweb

Senior Member
Joined
Jul 15, 2005
Messages
3,150
Reaction score
364
Age
57
Location
Sweden
Website
www.niallbrady.com
Your Mercedes
c238,w120 (diesel)
what a fantastic howto, Parrot of Doom you are a marvel,

as a matter of interest what model mercedes did you carry this job out on ?

well done

cheers
anyweb
 

sixpack

Senior Member
Joined
Mar 17, 2003
Messages
187
Reaction score
2
Location
Renfrew Scotland
Your Mercedes
2012 w212 220
Bulbs

Hi Parrot,

Great pictures, I did the same job on my C250 a while ago and found that the bulbs still some times didnt come on. I stripped it again and found a few dry joints on the tracks feeding the lamp. May save someone a double job.

Peter
 

Blobcat

Moderator
Joined
Feb 8, 2006
Messages
38,981
Reaction score
27,743
Location
Grange Moor
Your Mercedes
R171 SLK280, Smart R451, Land Rover 110 County SW, 997 C2S, R1250 GSA TE 40th, CBR600FP
what a fantastic howto, Parrot of Doom you are a marvel,

as a matter of interest what model mercedes did you carry this job out on ?

well done

cheers
anyweb
W210 E300TD
 
OP
Parrot of Doom

Parrot of Doom

Senior Member
Joined
Nov 14, 2005
Messages
2,167
Reaction score
4
Location
Manchester
Your Mercedes
Was an E300TD, now a Lexus LS400
  • Thread Starter
  • Thread starter
  • #8
Excelled once more P. My fan speed control does not always shut off, if I tap it with my knuckle it cycles between on/off so I am assuming the control is faulty, is that assumption right and if so would it be a simple job to replace the rotary control following your article?

You probably don't need to replace the control. If you follow my procedure, but purchase some switch cleaner spray (Maplins etc), any just give it a short squirt into the rotary switch for the fan speed (a short squirt is about 2-3 seconds, no more), it should work fine after that.

Of course there may be a dry joint on the PCB, such things are easy to detect, usually the solder will be blob shaped instead of cone shaped, or there may be a tiny crack around the joint that indicates a poor contact. A solder sucker/braid and 10 seconds with a soldering iron with fluxed solder usually fixes a dry joint :)
 

lackofgrip

Senior Member
Joined
Mar 15, 2007
Messages
155
Reaction score
0
Location
Close enough
nice job parrot of doom, you dont know how much mercedes charge for this do you as im no good at fiddly stuff:rolleyes:
 

C250TDSportAuto

Senior Member
Joined
Jan 8, 2007
Messages
62
Reaction score
0
Hope you don't mind me adding this to your fantastic post Parrot, but after reading your 'how to', i was inspired to repair the bulbs in mine.

I was convinced that there must be an easier way of replacing the bulbs other than by desoldering the switches.

Although the control unit is slightly different from that on my W202, I figured out how to remove the circuit board without desoldering the heater control pins, This may not work on the model shown by Parrot, but this is how it works on the heater control unit from my W202.

There is a clip/pin that goes straight through the centre of each of the temperature/direction control wheels. This clip connects the thumb wheel to the rotary switch.

The inner end of the clip can be seen here just below the number 2 on the heater settings. (the black dot in the middle of the cream bit) Use a small screwdriver to gently push the clip outwards.

attachment.php


Remove the clip

attachment.php


Then repeat at the other side where the direction control is.

Then simply pull the PCB away from the rear of the facia. This gives very easy access to the bulbs.

attachment.php


I would say that you should set both the thumb wheels either fully up or fully down before attempting this, and leave them that way throughout the process, so as not to alter their relation to the rotary switches. I imagine if this wasn't done then you could have hot air when you wanted cold etc.
 

Attachments

  • heater1.jpg
    heater1.jpg
    12.7 KB · Views: 582
  • heater2.jpg
    heater2.jpg
    33.9 KB · Views: 573
  • heater3.jpg
    heater3.jpg
    26.4 KB · Views: 586
OP
Parrot of Doom

Parrot of Doom

Senior Member
Joined
Nov 14, 2005
Messages
2,167
Reaction score
4
Location
Manchester
Your Mercedes
Was an E300TD, now a Lexus LS400
  • Thread Starter
  • Thread starter
  • #13
Well spotted, I didn't see those but they're almost certainly present on mine. Nice one :)
 

J666GAK

Member
Joined
Jan 9, 2006
Messages
15
Reaction score
0
Website
www.talk-diabetes.co.uk
Great how to mate!

I am thinking about changing the lights in my heater panel on my CLK (W208) would it be a similar process as in your E class?

Also it dosen't seam to mention which bulbs that you need appart from 12v? I have been asked if I want T5 or T10????

Also has anybody changed the bulbs around the gearshift?

Cheers
 

miker1

Senior Member
Joined
Mar 23, 2007
Messages
45
Reaction score
0
Humph! On my c200 [w202] the panel surrounding the gear lever does not want to lift at all!
I thought I would use this as my light on the gear indicator has blown. But I cant reach first base... ho hum.
 

anyweb

Senior Member
Joined
Jul 15, 2005
Messages
3,150
Reaction score
364
Age
57
Location
Sweden
Website
www.niallbrady.com
Your Mercedes
c238,w120 (diesel)

miker1

Senior Member
Joined
Mar 23, 2007
Messages
45
Reaction score
0
Thanks for that link, but its the panel style in piccie 1 of this post that I cant seem to lift [I assume the light for the auto stick is under there, with the electric window bulbs that ARE lighting up!]
Mike
 
Last edited:

anyweb

Senior Member
Joined
Jul 15, 2005
Messages
3,150
Reaction score
364
Age
57
Location
Sweden
Website
www.niallbrady.com
Your Mercedes
c238,w120 (diesel)
its held in by 4 plastic tabs on each of the corners more or less so apply force but be gentle
 
Top Bottom