What Have You Done To Your Merc Today?

Craiglxviii

Senior Member
Joined
Sep 6, 2015
Messages
17,781
Reaction score
7,426
Location
Cambs UK
Your Mercedes
970 Panamera Turbo; W221 S500L AMG Line, C215 CL500, W251 R350L AMG Line, plus several more now gone
Literally can't deal with that, my kids (5 and 7) know not to make a mess

SWMBO has major, and I mean major OCD about tidiness/ cleanliness. So much so it's pretty much CDO really. How she copes with eldest, who although utterly adorable is one of the messiest beings known to Christendom I do not know. She has the ability to eat a bag of crisps and leave a piece of literally every single crisp on the seats around her. It's astonishing.
 

MalcQV

Senior Member
Joined
May 4, 2017
Messages
278
Reaction score
85
Location
Manchester
Your Mercedes
Mercedes CLA200
I bought a centre brake light because mine ceased working. Looked online and it seems as MB had some crazy idea of putting the (what I used to call high level) brake light in the boot that eventually slamming shut will cause it to fail. Anyway I took the boot trim out a couple of nights ago, removed the old light and put the replacement in.
It still did not work. Turns out it was just a rusty pin connection on the connector. Took it out and cleaned it and the old centre light works.
I wish I had bothered to check first, I usually do but was just going on holiday as it the dash warning came on.
 

00slk

Senior Member
Joined
Dec 1, 2012
Messages
9,704
Reaction score
9,435
Location
Cambridgeshire UK
Your Mercedes
2002 SL55 AMG, 2005 E320 CDi, 2014 SLK250 CDi, 2003 SLK200
It sure does John, I certainly would not have attempted this without Malcolm's post and many thanks to Alistair for reinstating the pictures :cool:
He'll be looked on now as the new Malcolm ;) :)

IMG_20170928_210554.jpg

Main rubber back in place :D
 

ZZZZ

Senior Member
Joined
Sep 19, 2014
Messages
3,671
Reaction score
1,613
Your Mercedes
.
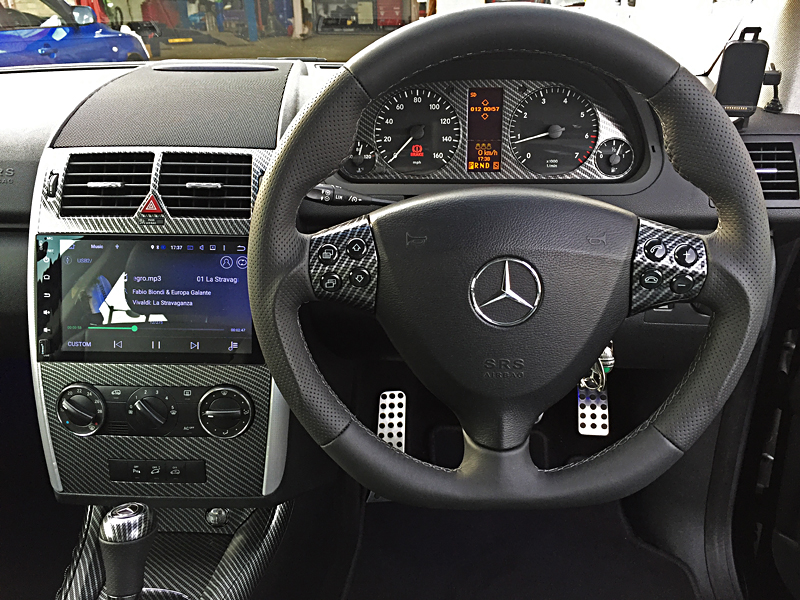
Fitted last few bits, i.e. the centre vents, the instrument cluster face, and a replacement power socket tray cover (the first one had a wobbly carbon pattern, and as LostKiwi correctly predicted, annoyed me to no end, so it's now gone).

36669282274_9dbee806fe_o.jpg
 

ZZZZ

Senior Member
Joined
Sep 19, 2014
Messages
3,671
Reaction score
1,613
Your Mercedes
.
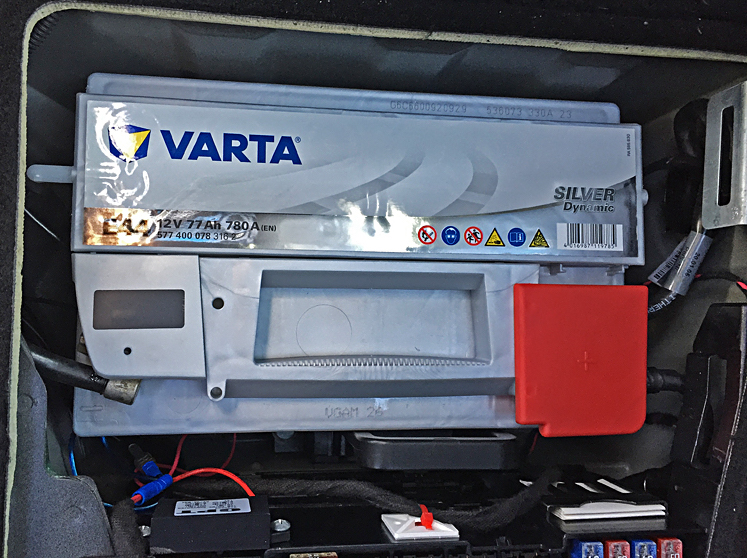
Forgot to mention - I also fitted a new, larger capacity (and size) battery - it was a bit of a struggle to fit it in, I had to secure the leads with cable ties and velcro, and to undo my own additions to the fuse box ;) - to allow me to get the battery in, but once in place, it was fine, with space for the breather, and the loom exit unobscured:

37131299800_13b708b7eb_o.jpg
 

Submariner1

Senior Member
Joined
Sep 3, 2016
Messages
4,694
Reaction score
788
Location
Windsor Berkshire
Your Mercedes
CL500 2009 5.5
Finally finished the hammerite brake caliper nightmare yesterday. Totally finished! :):)

One front caliper still had Clearcoat on it, and I didn't like the reacted crinkles on the wings of the one clear-coated front caliper ( note thats the iron part that rusts ... and wondered if they would rust under the lifted crinkles.) Plus I was unhappy that the other 3 were just plain hammerite.

IMG_4211.JPG
So as 5 weeks had elapsed, I thought lets just rub down the crinkles, and paint it pure hammerite again! So all 4 are at least the same i.e. pure Hammerite.

I then thought, hey the clearcoated 'block' part looks prettier and more maintainable, lets go for a dual finish, and mask that big bit off ... re-spray the crinkled wings leaving a dual paint finish. And then quickly spray the other side's 'block part' with clear-coat. So they all match and I get the benefit of the biggest bit looking good.

Luckily I mis positioned some blue 4 day masking tape (i.e. Not the strongest). Pulled it off and a ultra thin "sheet of clear-coat" came off!
WTF its had 5 weeks to set off and it felt hard.
Here is a small bit of masking tape
IMG_4295.JPG
You can just about see the film of clear-coat on it.
It came off so easily (despite feeling and looking rock solid), it was easier to dab it off with masking tape than sand it! And it left the underlying Hammerite finish smooth.

Basically zero adhesion!

Yes I did then give it a rub over with 1000 grit to key the new hammerite coat.
Thank god I didnt spray that other side with Clear-coat!! :)

I just posted this so any poor sod, who thinks you can clear-coat over hammerite, ( especially those who did it before) be warned the new formula hammerite just doesn't work with acrylic clear-coat!
.. so the thread doesnt need a load of sarcastic comments. It's just a curtesy warning to others.
And having re-painted them 3x thanks to sh*t incorrect advice from Hammerite technical, I am not really in the mood for sarcastic prats.

All 4 calipers done now in pure Hammerite ( the other 3 pure hammerite seem to be wearing well :):) )
IMG_4195.JPG

OK its not as pretty as the glossy clear-coat, but at least its not crinkly, and all 4 are the same.

I would love to put on my Mercedes Benz decals .... but after the nightmare I have had, I dare not risk one of them going on wonky or peeling off.

So if you want a really glossy finish, pick a high temp acrylic caliper paint and an acrylic clear-coat, that can be overcoated the same day!

If you have hammerite on there I also wouldnt risk overcoating with anything else.

A nightmare but an improvement over how they were ...
IMG_3664.JPG

Plus All the suspension bolt heads and nuts are now wire brushed derusted and painted silver ...
So she looks fine underneath :):):)

Driving time from now on. :):):)
 
Last edited:


Mercedes-Benz Servicing, repairs, engine and diagnostics
Wayne Gates - Mercedes-Benz, Unit F3, Phoenix Industrial Estate, Rosslyn Crescent, Harrow, Middlesex, HA1 2SP
Tel: 020 8863 9233
Established for 20 years all vehicles washed and vacuumed.
Top Bottom