HelpThisDude
Senior Member
- Joined
- Dec 2, 2008
- Messages
- 649
- Reaction score
- 5
- Location
- Essex
- Your Mercedes
- W203 C270CDI, R172 SLK55 AMG
Thermostat change for C270 CDI W203.
(C220 CDi W203 looks the same)
Tools:
Ratchet and 4” and/or 6” extension bar (¼” drive preferred).
Sockets 6mm, 7mm, 8mm.
Oil Filter housing socket.
Star/Torq bits, preferably ¼” drive size E12 and T27.
Suitable Jack.
Suitable Axle stands.
Soft material scraper.
Consumables:
Anti Freeze
Degreaser
Lint free cloth
Tooth brush
Parts:
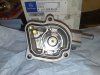
Thermostat Housing and Gasket.
‘O’ ring for oil filter housing.
(Stubby pipe between housing and block – If you feel it’s worth changing at the same time)
The first timers attempt….
If you would like to avoid expelled coolant sitting inside the under-tray tray….
1st Jack up the car, support with axle stands. Give your self enough room to be able to remove the engine under tray using 8mm socket.
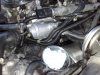
Working from above, remove engine covers using the T27 socket.
Assess what you can move out of the way to make the job easier.
I decided to remove the fuel delivery hose from fuel filter to pump. I took this off the fuel filter can, and covered the exposed hole to keep out dirt.
I also removed, what I can only assume is a test point, using a T12 and secured it out of my way.
I also removed the fuel rail sensor wires.
Allow engine to cool, and open the header tank to relieve pressure from system.
I then removed the water hoses.
NOTE: Be aware that there may be some pressure still in the system.
I removed the small bore to the header tank (6mm socket), first.
Then the large bore hose to the Radiator (7mm socket). And finally another small bore hose to the fuel cooler.
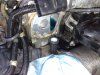
I thought it wise to clean the crud and dirt off the area before I unbolted the housing. Preventing contaminants from entering my coolant tracts.
I used a water-washable degreaser and a tooth brush, washing away the dirt with clean water once scrubbed up.
NOTE: there is one more “hose” under the thermostat housing.
This is a stiff 2 or 2 1/2” hose with flared ends. It is simply held in place by the clamping force between the engine block and thermostat housing. I re used the hose, however, this would be a good time to change it if you decide to do so.
It can only be changed when the housing is removed.
Be aware that once the housing is unbolted this hose will fall away.
Also this would be a good time to check the condition of all your hoses.
Remove the sensor wire from the housing. Push the small clip release with a small screw driver.
Identify the three E12 securing bolts, one on top, two below.
I tried to get away with not removing the oil filter housing out of fear or dropping stuff or seeping water into the oil system.
I quickly discovered that life is much easier with this removed.
Once removed, I bunged the exposed area up with a lint-free cloth, and coved over to stop bits falling in.
Using a size E12 torq bit carefully crack off the bolts on at a time, then remove.
My housing was stuck to the block and took some force to pry it away.
As soon as it came free the ‘short stiff hose’ talked about earlier made a break for freedom. Falling down the side of the engine.
Keep this in mind when removing the housing.
Clean up the area with cloth, and scraper if required but be careful with the alloy face. It goes without saying, do not damage the face!
The new part will come with a rubber gasket, fit this in place.
Get your ‘short stiff hose’ and press it into the opening in the block it came from, and offer up the housing, navigating between a fuel rail and everything else in the way, while making sure the annoying ‘short stiff hose’ also sits in the lower opening in the housing.
Once lined up, get your bolts into the housing and nip them up.
Make sure the ‘short stiff hose’ is in place, and the housing is aligned onto the block. Once happy, tighten up the bolts, bearing in mind that you are tightening a hard bolt into soft block, go one step too far and you will strip the threads.
Advised torque is 9 Nm.
Replace oil filter housing as soon as possible. Torque down to 25Nm. Strictly speaking, I should have used a new ‘O’ ring.
Add this to your list, if you like, when buying your thermostat.
Once tight, start getting all you hoses back in place.
I changed my hose clips at the same time. I left off the large radiator hose till last. I am going to try fill this hose with coolant before I replace.
Once all hoses are back in place, mix up some coolant.
Pour into the top hose, I managed to get 3 litres into the hose before if started to pour out of the housing.
Attach hose, tighten up clip.
Top up header tank.
On the C270 there is an electric water pump mounted behind the drivers side headlamp. (I checked on my C220 CDI W203 and there is no such pump) Switching on the ignition activates this.
I left it running for ten min in the hope that it may help remove air locks.
After a lot of gargling, the noises stopped.
I then started that car and let it warm up.
As far as I am aware I have no air locks and the car is heating up and cools as it should.
Over the next few days of running, keep an eye out for leaks, and check header tank levels if your paranoid (like me).
I left the engine covers off so I could check for leaks.
600miles later everything is ok.
My car warms up much faster, and blows warm air within 10min, (80deg within 15min) with an ambient of 5-6deg C, travelling almost immediately at 60mph.
Temp sits in the region of 85 to 95 deg C.
I hope this will give a heads-up to anyone attempting to change a thermostat one for the first time.
Save your self £185 of labour charges
(C220 CDi W203 looks the same)
Tools:
Ratchet and 4” and/or 6” extension bar (¼” drive preferred).
Sockets 6mm, 7mm, 8mm.
Oil Filter housing socket.
Star/Torq bits, preferably ¼” drive size E12 and T27.
Suitable Jack.
Suitable Axle stands.
Soft material scraper.
Consumables:
Anti Freeze
Degreaser
Lint free cloth
Tooth brush
Parts:
Thermostat Housing and Gasket.
‘O’ ring for oil filter housing.
(Stubby pipe between housing and block – If you feel it’s worth changing at the same time)
The first timers attempt….
If you would like to avoid expelled coolant sitting inside the under-tray tray….
1st Jack up the car, support with axle stands. Give your self enough room to be able to remove the engine under tray using 8mm socket.
Working from above, remove engine covers using the T27 socket.
Assess what you can move out of the way to make the job easier.
I decided to remove the fuel delivery hose from fuel filter to pump. I took this off the fuel filter can, and covered the exposed hole to keep out dirt.
I also removed, what I can only assume is a test point, using a T12 and secured it out of my way.
I also removed the fuel rail sensor wires.
Allow engine to cool, and open the header tank to relieve pressure from system.
I then removed the water hoses.
NOTE: Be aware that there may be some pressure still in the system.
I removed the small bore to the header tank (6mm socket), first.
Then the large bore hose to the Radiator (7mm socket). And finally another small bore hose to the fuel cooler.
I thought it wise to clean the crud and dirt off the area before I unbolted the housing. Preventing contaminants from entering my coolant tracts.
I used a water-washable degreaser and a tooth brush, washing away the dirt with clean water once scrubbed up.
NOTE: there is one more “hose” under the thermostat housing.
This is a stiff 2 or 2 1/2” hose with flared ends. It is simply held in place by the clamping force between the engine block and thermostat housing. I re used the hose, however, this would be a good time to change it if you decide to do so.
It can only be changed when the housing is removed.
Be aware that once the housing is unbolted this hose will fall away.
Also this would be a good time to check the condition of all your hoses.
Remove the sensor wire from the housing. Push the small clip release with a small screw driver.
Identify the three E12 securing bolts, one on top, two below.
I tried to get away with not removing the oil filter housing out of fear or dropping stuff or seeping water into the oil system.
I quickly discovered that life is much easier with this removed.
Once removed, I bunged the exposed area up with a lint-free cloth, and coved over to stop bits falling in.
Using a size E12 torq bit carefully crack off the bolts on at a time, then remove.
My housing was stuck to the block and took some force to pry it away.
As soon as it came free the ‘short stiff hose’ talked about earlier made a break for freedom. Falling down the side of the engine.
Keep this in mind when removing the housing.
Clean up the area with cloth, and scraper if required but be careful with the alloy face. It goes without saying, do not damage the face!
The new part will come with a rubber gasket, fit this in place.
Get your ‘short stiff hose’ and press it into the opening in the block it came from, and offer up the housing, navigating between a fuel rail and everything else in the way, while making sure the annoying ‘short stiff hose’ also sits in the lower opening in the housing.
Once lined up, get your bolts into the housing and nip them up.
Make sure the ‘short stiff hose’ is in place, and the housing is aligned onto the block. Once happy, tighten up the bolts, bearing in mind that you are tightening a hard bolt into soft block, go one step too far and you will strip the threads.
Advised torque is 9 Nm.
Replace oil filter housing as soon as possible. Torque down to 25Nm. Strictly speaking, I should have used a new ‘O’ ring.
Add this to your list, if you like, when buying your thermostat.
Once tight, start getting all you hoses back in place.
I changed my hose clips at the same time. I left off the large radiator hose till last. I am going to try fill this hose with coolant before I replace.
Once all hoses are back in place, mix up some coolant.
Pour into the top hose, I managed to get 3 litres into the hose before if started to pour out of the housing.
Attach hose, tighten up clip.
Top up header tank.
On the C270 there is an electric water pump mounted behind the drivers side headlamp. (I checked on my C220 CDI W203 and there is no such pump) Switching on the ignition activates this.
I left it running for ten min in the hope that it may help remove air locks.
After a lot of gargling, the noises stopped.
I then started that car and let it warm up.
As far as I am aware I have no air locks and the car is heating up and cools as it should.
Over the next few days of running, keep an eye out for leaks, and check header tank levels if your paranoid (like me).
I left the engine covers off so I could check for leaks.
600miles later everything is ok.
My car warms up much faster, and blows warm air within 10min, (80deg within 15min) with an ambient of 5-6deg C, travelling almost immediately at 60mph.
Temp sits in the region of 85 to 95 deg C.
I hope this will give a heads-up to anyone attempting to change a thermostat one for the first time.
Save your self £185 of labour charges
Attachments
Last edited:
