brandwooddixon
Senior Member
- Joined
- Jul 31, 2006
- Messages
- 4,297
- Reaction score
- 1,145
- Location
- Wolverhampton
- Your Mercedes
- S63 Coupe 2014
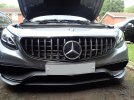
I recently changed the grille on my 2014 S63 Coupe to a black Panamericana style one as used on the latest AMG vehicles.
Although my car already had one when I purchased it recently, there were a couple of issues that I thought could be improved - it had chrome verticals and the look was spoilt when the cover for the Night Vision camera was removed; this style of grille leaves quite wide spaces for road debris to get through to the radiator.
So I replaced it with a gloss black version.
Here's some comparison pictures of before and after.

Along with the grille I purchased some black aluminium mesh (as used in racing cars) to place behind the grille. I purchased a strip that was approximately 100 x 30cm. This isn't the full width of the grille, but I attached it in two pieces as there's quite a large void area behind the star emblem for the Distronic on my car. I cut the mesh to size and shaped it before fitting the grille, allowing about 1cm overlap which I then bent around the grille edge before fixing in place. I used some black mastic type adhesive/sealant that was suitable for the temperature range that the grille will be subjected to and also waterproof.
I left voids in the mesh for the Distronic Radar sensor and also for the Night Vision camera, cutting the mesh with wire cutters and tin snips as appropriate. With the mesh in situ it is easier to cut close to the plastic members of the grille to ensure that the cut ends are hidden from the front.
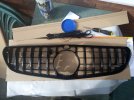
Here's my grille in preparation for the mesh.
Fitting the new grille requires removal of the front bumper. Although the grille, new and old, have push fit connectors they do not allow for the easy removal of either from the main bumper from the front but require releasing from the back.
The bumper is fixed to the rest of the car by a number of different fixings. Some of these are only accessible from the back of the bumper and will require removal of under engine or wheel arch panels.
Here is a comprehensive list of tools required:
T25 Torx driver - some are in narrow access areas.
8mm socket or hex nut spinner - note narrow access for two nuts 1/2" drive socket will be too big.
8mm spanner
10mm socket
extension bar (say 10 inches/250mmmm) for the 10mm socket
Flat blade screwdriver 1/4" or 6mm wide blade tip sufficient.
Car jack
Two axle stands
Wheel removal tools + torque wrench.
Please note:
1. Ensure safe working practice and support the car on axle stands not on a jack.
2. Ideally you should disconnect the negative lead on the battery before commencing (I didn't as it's hidden behind panelling in the boot - I think - and I wanted to be able to lock the car).
3. If not disconnecting the battery I'd recommend keeping the key well away from the car just in case the Keyless Go keeps the electrics awake or activates something.
4. Left and right side given as viewed from the driver's seat facing forward.
5. It's advisable to have a second pair of hands available when actually removing the bumper, as it can be awkward to handle.
Process overview:
1. Remove both front road wheels, supporting the front suspension on axle stands as you do so.
2. Open the bonnet.
3. Unfasten the front section of each wheel arch liner. There are a mix of plastic expanding plug type and 10mm nut style fixings.
4. Remove the front under-engine panel (10mm hex headed screw with washers). You'll need to remove the row where the second panel under the engine proper is fixed as well, which can then be lowered to give you enough room to remove the front panel.
5. On the left side, accessible through the wheel arch.
a) Disconnect the electrical connections for the parking and pedestrian impact sensors. Note the parking sensor connector has a small security wedge locking the connectors together.
b) Above the connectors remove the T25 Torx bolt that holds a bumper fixing wedge in place.
c) Above that remove two T25 screws that screw through a plastic bar (white on my car) that secures that section of the bumper trim to the front wing.
The picture below shows these items on the bumper.
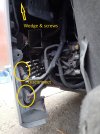
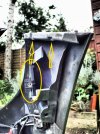
Wedge is circled, screw positions arrowed. Mirrored positions on the left.
6. On the right side, accessible from underneath:
a) detach the temperature sender and unclip the wire from their locations in the bumper.
b) remove the nearby 8mm hex headed screw that secures some lower part of the bumper trim to an under panel support.
Picture below shows the temperature sender and 8mm fixing (this fixing is mirrored on the left side)
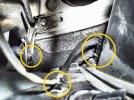
7. On the left side, accessible from underneath remove the 8mm hex headed screw that secures some lower part of the bumper trim to an under panel support.
8. On the right side, accessible through the wheel arch:
a) Remove the T25 torx bolt that holds a bumper fixing wedge in place.
b) Above that remove two T25 screws that screw through a plastic bar (white on my car) that secures that section of the bumper trim to the front wing.
9. Remove the Mercedes star from the grille. Turn 15-20 degrees anticlockwise. Some cars may have an electrical connection to this. Mine didn't but I needed to remove it so that I could place it on my new grille. If, like me, you have Distronic fitted then rubber gloves will give you better purchase to remove it.
10. Accessible from the engine bay on the left and right sides, remove the 8mm headed screw that fixes the bumper trim above the headlight to the wing.
11. Remove the T25 screws that attach the top parts of the bumper trim to the slam panel - including those that fix one end above the headlight (on my car these panels are fixed to the bumper trim with what feels like double sided foam/rubber tape as it has a slight give).
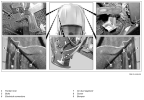
Shown here is the location of the fixings.
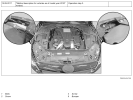
12. Accessible through the top of the slam panel through apertures next to the bonnet catches, remove the 10mm bolts that are the final fixings holding the bumper to the car.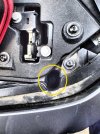
The bumper should now slide forward for removal.
With the bumper off you can now remove the grit, twigs, leaves and other debris that has collected around the various radiators that are now exposed.
Refitting the bumper is a reversal of the above.
Note:
You'll need something to either hold the 10mm recessed bolt to your socket or use another tool (I used a magnetic pickup) to place the bolt .
When refitting the bumper, don't fully tighten the screws that hold the bumper down along the top to the slam panel. This will allow you to adjust the gap around the bonnet edge. I think 4-5mm looks about right. Fully tighten once adjusted.
Don't forget to reconnect the electrical connectors on the left side like I did!
If fitting a new grille then the old one will require removal.
The grille is held to the bumper by a number of fixing tabs with wedge shaped extrusions that fix into slots in the bumper.
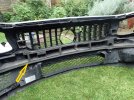
These can be unfixed by use of a flat bladed screw driver, however the bottom half of the grille and the fixings are hidden behind the pedestrian impact sensor - a long polystyrene shaped fixing with an air tube within it. This may require removal to gain access to the fixings.
This is indicated in the picture below by the arrow.
Although my car already had one when I purchased it recently, there were a couple of issues that I thought could be improved - it had chrome verticals and the look was spoilt when the cover for the Night Vision camera was removed; this style of grille leaves quite wide spaces for road debris to get through to the radiator.
So I replaced it with a gloss black version.
Here's some comparison pictures of before and after.


Along with the grille I purchased some black aluminium mesh (as used in racing cars) to place behind the grille. I purchased a strip that was approximately 100 x 30cm. This isn't the full width of the grille, but I attached it in two pieces as there's quite a large void area behind the star emblem for the Distronic on my car. I cut the mesh to size and shaped it before fitting the grille, allowing about 1cm overlap which I then bent around the grille edge before fixing in place. I used some black mastic type adhesive/sealant that was suitable for the temperature range that the grille will be subjected to and also waterproof.
I left voids in the mesh for the Distronic Radar sensor and also for the Night Vision camera, cutting the mesh with wire cutters and tin snips as appropriate. With the mesh in situ it is easier to cut close to the plastic members of the grille to ensure that the cut ends are hidden from the front.
Here's my grille in preparation for the mesh.

Fitting the new grille requires removal of the front bumper. Although the grille, new and old, have push fit connectors they do not allow for the easy removal of either from the main bumper from the front but require releasing from the back.
The bumper is fixed to the rest of the car by a number of different fixings. Some of these are only accessible from the back of the bumper and will require removal of under engine or wheel arch panels.
Here is a comprehensive list of tools required:
T25 Torx driver - some are in narrow access areas.
8mm socket or hex nut spinner - note narrow access for two nuts 1/2" drive socket will be too big.
8mm spanner
10mm socket
extension bar (say 10 inches/250mmmm) for the 10mm socket
Flat blade screwdriver 1/4" or 6mm wide blade tip sufficient.
Car jack
Two axle stands
Wheel removal tools + torque wrench.
Please note:
1. Ensure safe working practice and support the car on axle stands not on a jack.
2. Ideally you should disconnect the negative lead on the battery before commencing (I didn't as it's hidden behind panelling in the boot - I think - and I wanted to be able to lock the car).
3. If not disconnecting the battery I'd recommend keeping the key well away from the car just in case the Keyless Go keeps the electrics awake or activates something.
4. Left and right side given as viewed from the driver's seat facing forward.
5. It's advisable to have a second pair of hands available when actually removing the bumper, as it can be awkward to handle.
Process overview:
1. Remove both front road wheels, supporting the front suspension on axle stands as you do so.
2. Open the bonnet.
3. Unfasten the front section of each wheel arch liner. There are a mix of plastic expanding plug type and 10mm nut style fixings.
4. Remove the front under-engine panel (10mm hex headed screw with washers). You'll need to remove the row where the second panel under the engine proper is fixed as well, which can then be lowered to give you enough room to remove the front panel.
5. On the left side, accessible through the wheel arch.
a) Disconnect the electrical connections for the parking and pedestrian impact sensors. Note the parking sensor connector has a small security wedge locking the connectors together.
b) Above the connectors remove the T25 Torx bolt that holds a bumper fixing wedge in place.
c) Above that remove two T25 screws that screw through a plastic bar (white on my car) that secures that section of the bumper trim to the front wing.
The picture below shows these items on the bumper.


Wedge is circled, screw positions arrowed. Mirrored positions on the left.
6. On the right side, accessible from underneath:
a) detach the temperature sender and unclip the wire from their locations in the bumper.
b) remove the nearby 8mm hex headed screw that secures some lower part of the bumper trim to an under panel support.
Picture below shows the temperature sender and 8mm fixing (this fixing is mirrored on the left side)

7. On the left side, accessible from underneath remove the 8mm hex headed screw that secures some lower part of the bumper trim to an under panel support.
8. On the right side, accessible through the wheel arch:
a) Remove the T25 torx bolt that holds a bumper fixing wedge in place.
b) Above that remove two T25 screws that screw through a plastic bar (white on my car) that secures that section of the bumper trim to the front wing.
9. Remove the Mercedes star from the grille. Turn 15-20 degrees anticlockwise. Some cars may have an electrical connection to this. Mine didn't but I needed to remove it so that I could place it on my new grille. If, like me, you have Distronic fitted then rubber gloves will give you better purchase to remove it.
10. Accessible from the engine bay on the left and right sides, remove the 8mm headed screw that fixes the bumper trim above the headlight to the wing.
11. Remove the T25 screws that attach the top parts of the bumper trim to the slam panel - including those that fix one end above the headlight (on my car these panels are fixed to the bumper trim with what feels like double sided foam/rubber tape as it has a slight give).
Shown here is the location of the fixings.

12. Accessible through the top of the slam panel through apertures next to the bonnet catches, remove the 10mm bolts that are the final fixings holding the bumper to the car.

The bumper should now slide forward for removal.
With the bumper off you can now remove the grit, twigs, leaves and other debris that has collected around the various radiators that are now exposed.
Refitting the bumper is a reversal of the above.
Note:
You'll need something to either hold the 10mm recessed bolt to your socket or use another tool (I used a magnetic pickup) to place the bolt .
When refitting the bumper, don't fully tighten the screws that hold the bumper down along the top to the slam panel. This will allow you to adjust the gap around the bonnet edge. I think 4-5mm looks about right. Fully tighten once adjusted.
Don't forget to reconnect the electrical connectors on the left side like I did!
If fitting a new grille then the old one will require removal.
The grille is held to the bumper by a number of fixing tabs with wedge shaped extrusions that fix into slots in the bumper.
These can be unfixed by use of a flat bladed screw driver, however the bottom half of the grille and the fixings are hidden behind the pedestrian impact sensor - a long polystyrene shaped fixing with an air tube within it. This may require removal to gain access to the fixings.
This is indicated in the picture below by the arrow.

