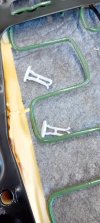
SLK r172 seat squab removal.

00slk

Senior Member
Joined
Dec 1, 2012
Messages
10,317
Reaction score
10,637
Location
Cambridgeshire UK
Your Mercedes
2002 SL55 AMG, 2005 E320 CDi, 2014 SLK250 CDi, 2003 SLK200
I am about to replace the air bag mat on the SLK. As this is completely new to me, is there any information to follow on this procedure?
Many thanks.
20230909_104442.jpg
 
OP
00slk

00slk

Senior Member
Joined
Dec 1, 2012
Messages
10,317
Reaction score
10,637
Location
Cambridgeshire UK
Your Mercedes
2002 SL55 AMG, 2005 E320 CDi, 2014 SLK250 CDi, 2003 SLK200
  • Thread Starter
  • Thread starter
  • #2
All sorted now :D
 
OP
00slk

00slk

Senior Member
Joined
Dec 1, 2012
Messages
10,317
Reaction score
10,637
Location
Cambridgeshire UK
Your Mercedes
2002 SL55 AMG, 2005 E320 CDi, 2014 SLK250 CDi, 2003 SLK200
  • Thread Starter
  • Thread starter
  • #4
It would be nice to advise on how you did it… throw a crumb for new members ;):p
Certainly will Russ, took stage pictures ;)
 
OP
00slk

00slk

Senior Member
Joined
Dec 1, 2012
Messages
10,317
Reaction score
10,637
Location
Cambridgeshire UK
Your Mercedes
2002 SL55 AMG, 2005 E320 CDi, 2014 SLK250 CDi, 2003 SLK200
  • Thread Starter
  • Thread starter
  • #8
Further to my question yesterday on how to remove the seat cushion on the r172, it was quite easy, but a little fiddly with the wire fasteners. I did a series of pictures during the replacement mat, so thought Russ might be able to add it to the DIY threads?
The sensor mat for the airbag can fail on the passenger seat, this is apparently a common fault with the r172. Shows as a fault code B275296.
The most easiest part is removing the seat from the car, even easier with the roof down!
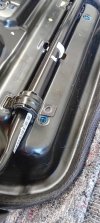
With the seat placed upside down on the support bench there are a few small cable ties to snip. Disconnect the wiring to the sensor pad. Then 2 bolts to undo at the front of the seat that holds the squab to the frame. Once these are out, slide the squab forward and clear of the frame.

20230909_105841.jpg

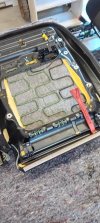
Next I unfolded the seat fabric retaining plastic by stretching it up to release the lugs, which left the fabric retaining wires.

20230909_110805.jpg

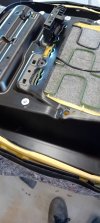
Not knowing how to release these wires I decided to look at the small white plastic clips under the seat and after prodding and poking at them, I lifted these up slightly with a thin screwdriver and twisted them with released them from the wire.

20230909_111903.jpg

Once all the white clips were out holding the fabric in length wise, I found more wires holding the fabric crosswise.
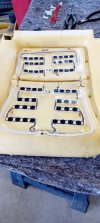
These were small red clips that just needed a slight tug upwards on the wires to be released. Once the fabric was off, it left the exposed sensor mat.

20230909_113313.jpg

Removed the mat, fit the new one (feeding the wiring and box through first) which was basically a reverse procedure of the mat removal, simple.
Now the most fiddle part is lining up the seat cushion/fabric back on to the frame. Those little red clips were easy, it was lining up the white clips to the wire. These need to be clipped in in the same place as they were removed which was harder than it looked. The purpose of this wire and the white clips hold the seat fabric tight to the sensor pad to stop it sliding. It was easier to have 2 people, one to push the seat cushion as close as possible to the white clip so it clicks in place. once the seat bottom is in place, restretch the fabric and plastic back over the frame.

20230909_121303.jpg
You will be ready to slide the seat back to the main frame, fit the bolts and replace the back back into the car.
You will also need to rescan and clear the stored faults.
 
Top Bottom