markben
Senior Member
- Joined
- Feb 12, 2017
- Messages
- 228
- Reaction score
- 305
- Location
- Bristol UK
- Your Mercedes
- w220 2004 S320L CDI
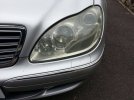
Some of you might remember me Posting recently about my original 18 year-old N/S Bi xenon headlamp lens / cover having gone terminally cloudy & yellowed. In daylight it looked ‘sad’ compared with the much newer crystal-clear O/S one. And.. although not an MOT issue (yet), the lens cloudiness was making the HID low beam light look fuzzy in darkness.
No amount of DIY or ‘professional’ polishing made a significant difference to its clarity and cosmetic ‘match’ with the newer one, and it gradually worsened. A complete new OE headlamp unit would cost upwards of £500 (Eek! ) and of course even a ‘good’ used one would cost approx. £100 + fitting costs and still not match the clarity of the much newer headlamp
  . Even my local ‘pro’ bodyshop guy had shied-away from replacing just the lens. (Maybe too fiddly and / or not cost effective even for him?). Mmmm… I’ll say no more.
So: I took a gamble and ordered a sparkly / crystal clear new Acrylic lens from some nice Chinese folks via Eebuygum. £30 inc 7-day delivery. Hey ho, the quality looked good online, so worth a try? A few pals on another MB W220 forum in the US say they'd done the same with great results.
Today: with Heart in Mouth (in case of major problems), I fitted it successfully after doing some online research about the various technicalities. Rather than drag you through ALL 23 dismantling / re-assembly steps (!): only to say it’s a ‘fiddly’ job but not too complicated for a competent DIY-er and I completed it in just 2 hours.
The main (most common?) query about removing the acrylic lens cover is how, exactly, to detach it from the casing and soften the original VERY sticky airtight & weatherproof sealant. In my case: some gentle heat around the joint edge using a domestic hairdryer + some ‘easing’ with a sharp craft knife + plastic trim-removal tool worked ok. It takes patience, persistence & care: but the old lens was removed after about 10 mins - and leaving much of the original sealant intact in the groove between lens & casing without unsightly overspill on either. Phew…!
The delicate reflective silver coating & HID bulb covers inside the headlamp unit are pristine (still, after 18 years!). So I gave them a gentle brush-over & de-dust with a very soft artist’s paintbrush before attaching the new lens by pressing it HARD into the joint groove & remaining sealant and then re-attaching the sprung metal retaining clips after re-tensioning them for a tighter (& hopefully long-term airtight weatherproof) fit. Time will tell…
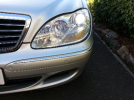
Result & Conclusion? YAY! So far, so good. An ‘As New’ looking N/S headlamp unit for less than 10% of the cost of a new OE one. Day & Night, it looks perfect. It’s only taken me 5 years to get around to it: but worth the wait, time & effort!
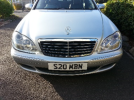
Here are the Before & After Pics, hope this helps anyone here who’s considering doing a similar project? I'll be pleased to answer any questions from my (stress) 'Amateur' experience of doing this DIY Headlamp Restoration Job.
MB
‘The Best or Nothing’


No amount of DIY or ‘professional’ polishing made a significant difference to its clarity and cosmetic ‘match’ with the newer one, and it gradually worsened. A complete new OE headlamp unit would cost upwards of £500 (Eek!
So: I took a gamble and ordered a sparkly / crystal clear new Acrylic lens from some nice Chinese folks via Eebuygum. £30 inc 7-day delivery. Hey ho, the quality looked good online, so worth a try? A few pals on another MB W220 forum in the US say they'd done the same with great results.
Today: with Heart in Mouth (in case of major problems), I fitted it successfully after doing some online research about the various technicalities. Rather than drag you through ALL 23 dismantling / re-assembly steps (!): only to say it’s a ‘fiddly’ job but not too complicated for a competent DIY-er and I completed it in just 2 hours.
The main (most common?) query about removing the acrylic lens cover is how, exactly, to detach it from the casing and soften the original VERY sticky airtight & weatherproof sealant. In my case: some gentle heat around the joint edge using a domestic hairdryer + some ‘easing’ with a sharp craft knife + plastic trim-removal tool worked ok. It takes patience, persistence & care: but the old lens was removed after about 10 mins - and leaving much of the original sealant intact in the groove between lens & casing without unsightly overspill on either. Phew…!
The delicate reflective silver coating & HID bulb covers inside the headlamp unit are pristine (still, after 18 years!). So I gave them a gentle brush-over & de-dust with a very soft artist’s paintbrush before attaching the new lens by pressing it HARD into the joint groove & remaining sealant and then re-attaching the sprung metal retaining clips after re-tensioning them for a tighter (& hopefully long-term airtight weatherproof) fit. Time will tell…
Result & Conclusion? YAY! So far, so good. An ‘As New’ looking N/S headlamp unit for less than 10% of the cost of a new OE one. Day & Night, it looks perfect. It’s only taken me 5 years to get around to it: but worth the wait, time & effort!
Here are the Before & After Pics, hope this helps anyone here who’s considering doing a similar project? I'll be pleased to answer any questions from my (stress) 'Amateur' experience of doing this DIY Headlamp Restoration Job.
MB
‘The Best or Nothing’


Last edited:

