MechPhil
Senior Member
- Joined
- Feb 8, 2012
- Messages
- 488
- Reaction score
- 2
- Location
- Brandfort, South Africa
- Your Mercedes
- '87 260E
One of those irritating problems (one of VERY VERY few) with the W123 series is that the manual window winder (or window regulator, as it is often called) mechanisms fail. Considering the age of these vehicles, and the fact that in South Africa they were most beloved by farmers who used them as “town cars”, and have, as such, seen lots of unpaved roads, this part is by no means under-engineered.
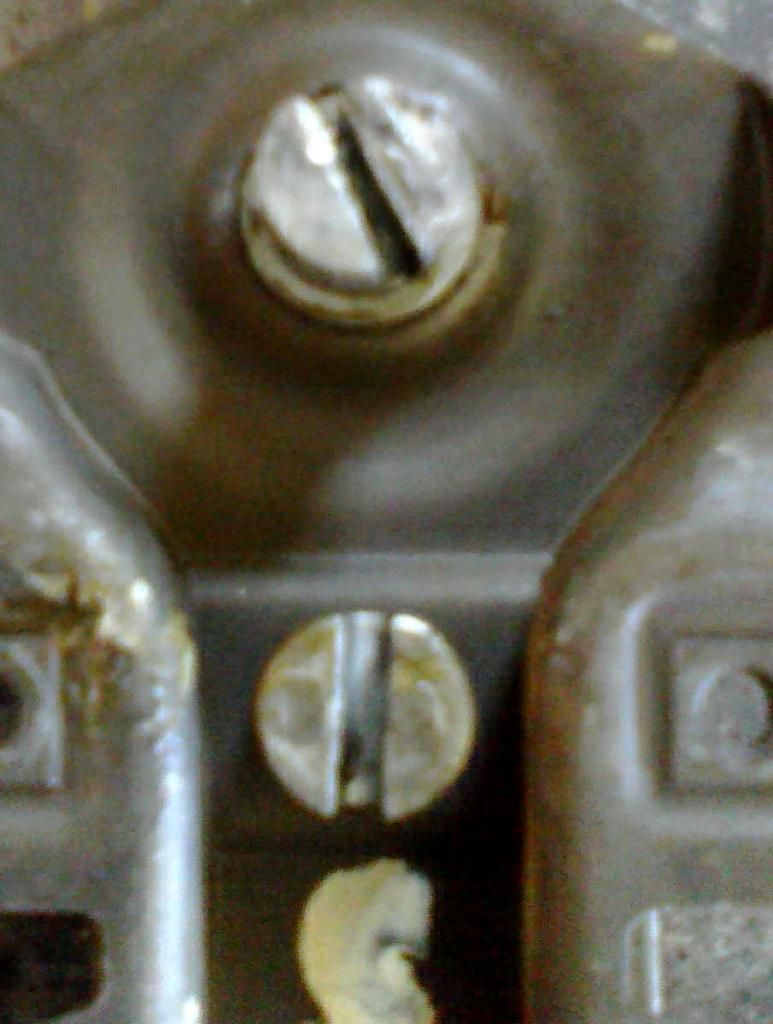
I have encountered at least ten of these cases in my exploits with 123’s, and it’s always been the same problem: the locating pin (pointed at in the first picture) that holds the pinion (the part that is wound by winding the handle) to the rack (the curved gear teeth) comes adrift.
I was recently given a W123 200 that I did some minor work on a few years ago, and the day I drove it back home, the mechanism bought it! Go figure!
Here are the steps I took (as I have done with at least 6 previous cars) to repair this. The repair is inexpensive and permanent, but some workshop skills and equipment are required.
You will need: Flat head screwdrivers
Phillips head screwdrivers
10mm spanner and/or
10mm socket and extension
Ball-peen hammer
Electric drill
3.2mm (or other appropriate) drill bit
M4.0 x 0.7 tap (or any size between 3.5mm and 5mm)
Appropriate screw to fit the hole made with the drill and tap
Fender washer to fit the screw
Pliers
Contact glue
First off, remove the doorpanel. To achieve this, remove the window winder handle by sliding the plastic trim off the handle by pushing it from the knob to the centre. Use a flat screwdriver to lightly wedge between the knob and the plastic trimpiece if necessary. With the trimpiece off, the handle should simply pull off the splines of the pinion with very little effort.
Use the flat screwdriver to wedge out the black plastic “dish” behind the inner doorhandle. Once the dish has been removed, undo the screw holding the chromed trim frame under the handle, and remove the frame. Undo the screws holding the “c” shaped chromed trimpiece over the doorlock mechanism, and remove the trimpiece. If your car has central locking, do not attempt to remove the locking pins, as they do not screw onto the lever inside the doorpanel. If it has manual locking, the pins can, and will have to be screwed out. Remove the two screws from the grabhandle using a phillips screwdriver in the holes in the bottom of the handle.
Get your fingers between the doorpanel (NOT A SCREWDRIVER) and the metal frame of the door. There are small plastic lugs that are attached to the doorpanel and snap into holes in the doorframe. Snap these lugs out of the doorframe by tugging rather heavily at the panel. Try to tug with your fingers as close as possible to the lugs to avoid excessive bending of the doorpanel.
Once all the lugs are out, the oddments bin on the doorpanel, and the top of the panel, just behind the rubber seal of the window will still hold the panel to the frame. Lift the panel (Often, these panels have not been removed for thirty odd years, so they do need some persuasion) out of the rubber behind the window, and the oddments bin will also be lifted out.
The plastic sheet behind the panel is very important for dust-proofing. Remove it in such a way that it can be fitted again, using contact glue.
Remove the two bolts holding the bottom edge of the window to the mechanism (one is right near the edge of the door, and will have to be removed through the smallish hole right on the free edge of the doorframe). Lift the glass out of the mechanism, and set it down gently in the bottom of the door.
Remove the four bolts around the pinion (that’s the splined shaft the handle attaches to), and after marking (or just noting the marks on the paint made by the bolts) remove the two bolts near the free edge of the door, holding the sliding part of the mechanism. Now manoeuvre the mechanism out of the door by getting the sliding section out first, then the pinion section.
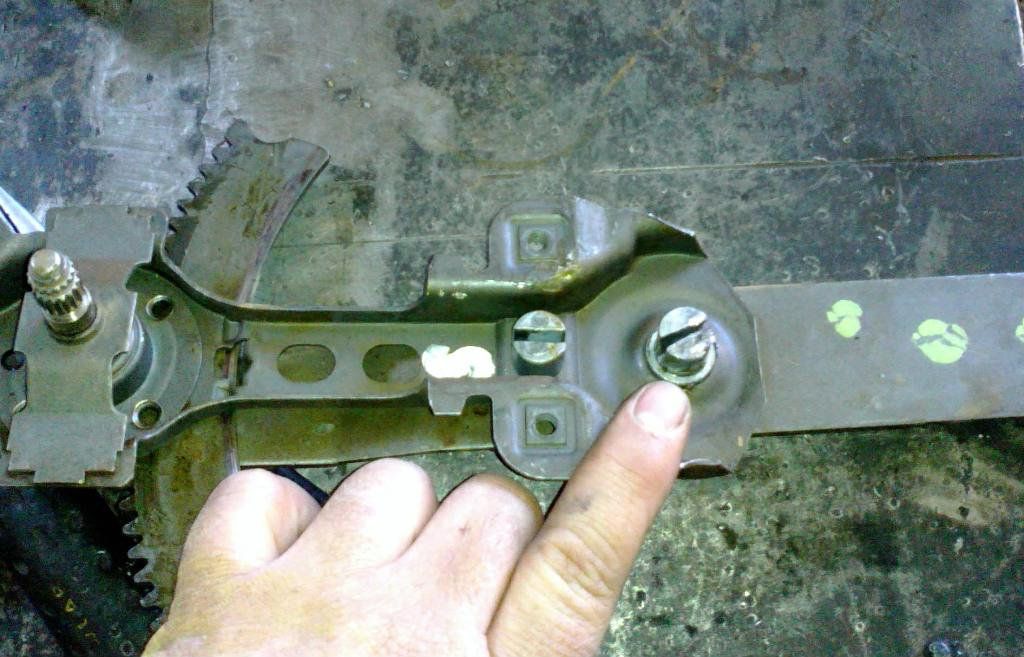
Loose pin and arthritic finger
Note the two slotted pins protruding from the mechanism. The one I am pointing at in this picture should protrude right through both plates and should be burred on the underside (the opposite side to the slot) to prevent it from pulling out. This burr has normally given up the good fight, and the pin pulled itself out of the rear plate (that’s the one with the curved rack on the end). If the coiled spring wasn’t attached to the mechanism as it came out, fish it out the door cavity, it cannot have fallen out!
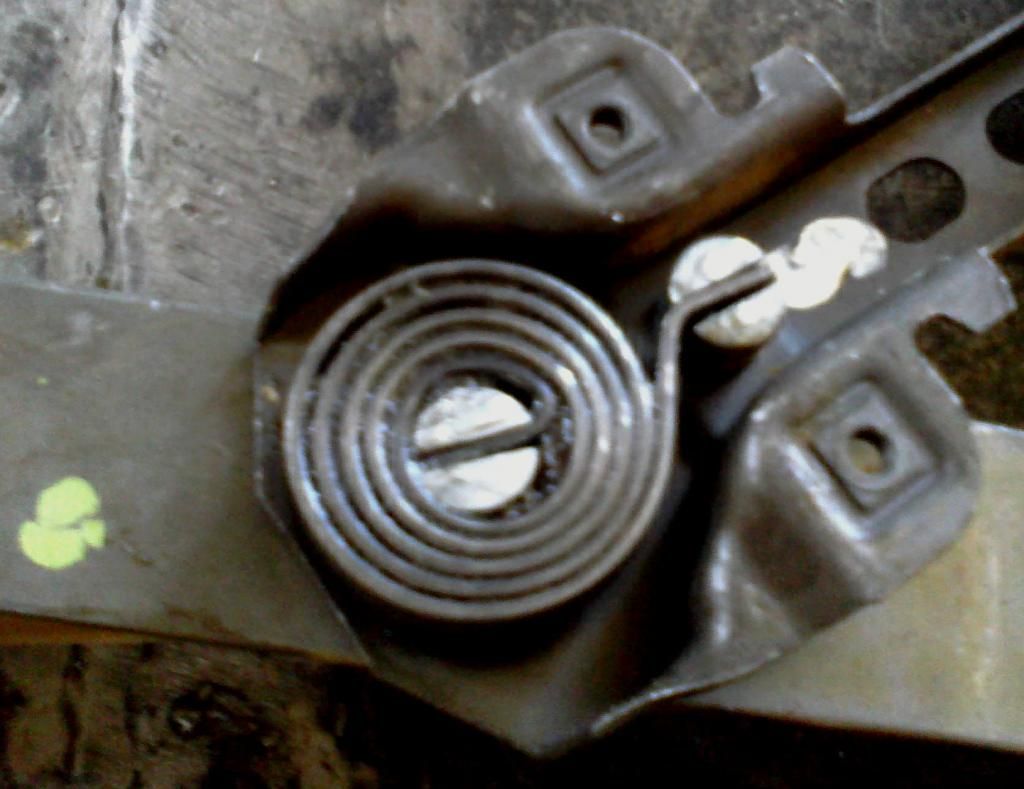
Using the ball-peen hammer, tap the pin back through the square hole in the (rack)plate, and “set” it by burring the end of the pin (not the slotted end!!) so it cannot pull out easily. Be careful not to hit too hard, as this will damage the slotted end of the pin! This burring is not enough to keep the pin in position permanently, and since the pin is not made of steel, it cannot be simply welded in.
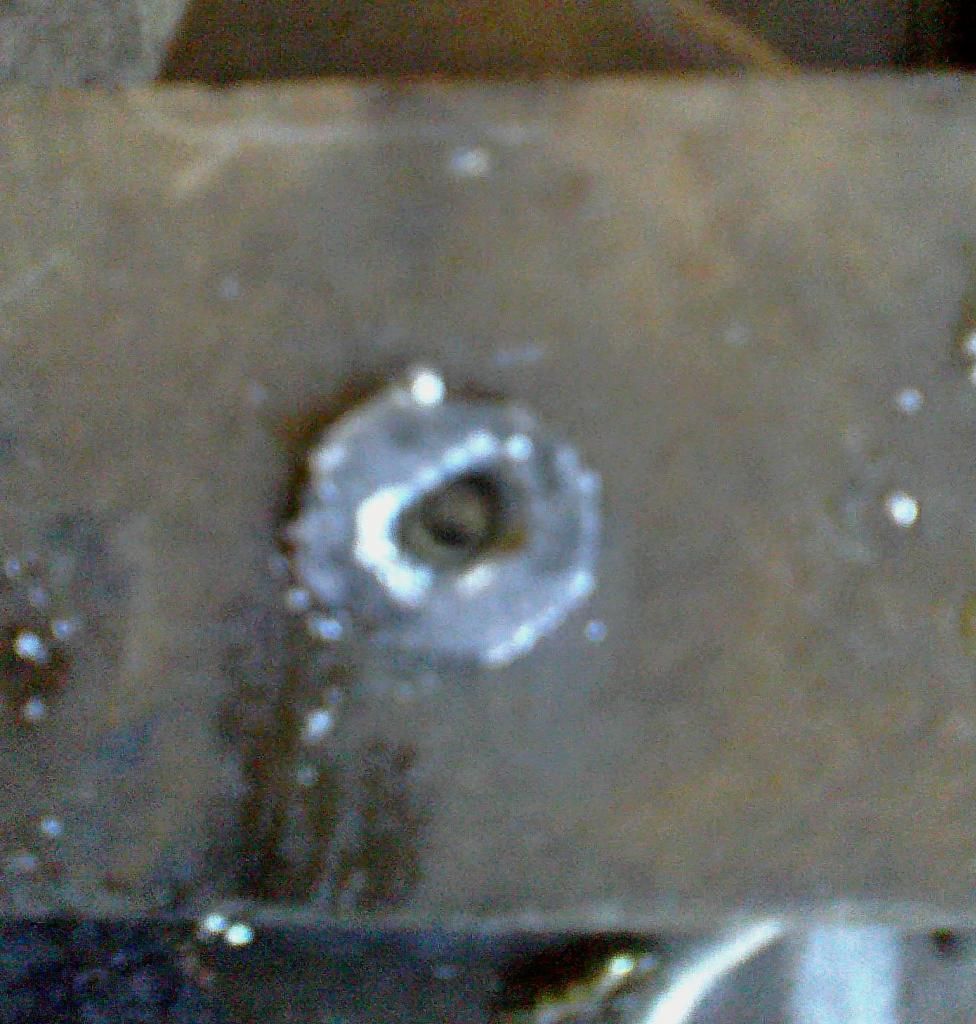
Please excuse the poor quality of the photographs... This one shows the back end of the pin after setting.
In order to find an appropriate screw, first see (if you have a set of taps and dies) if you have any taps of around 4mm. Then attempt to find a screw of the same thread as the tap. Else, you will have to buy both a screw and a tap. I am in the fortunate position to a “glory box” with thousands of bolts, nuts, washers and various odds, ends and other paraphernalia where I found a screw of M4.0 x 0.7 thread, with a washer with an outside diameter of 15mm, and i also have access to literally hundreds of taps. I suggest keeping the sizes of the screw between 3.5 and 5mm. Smaller than 3.5 would not be strong enough, and larger would diminish the diameter of the pin to such an extent that it may break.
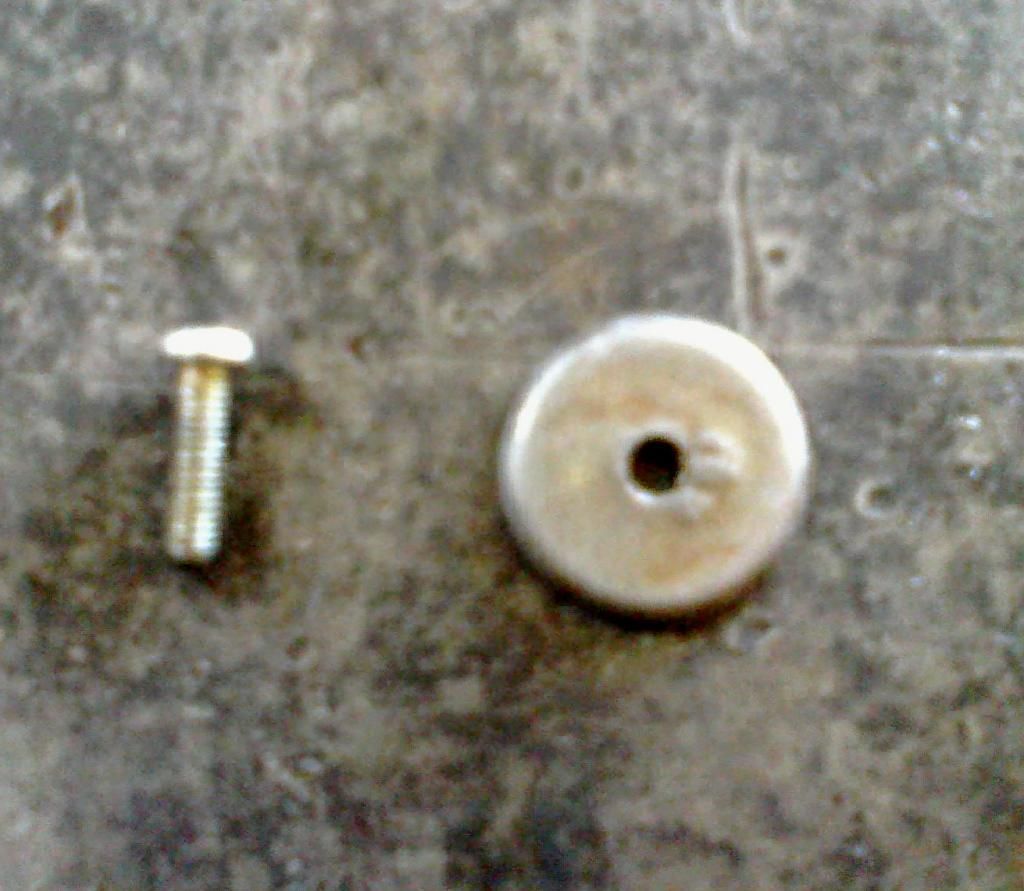
Here are the screw and washer I found.
Using a drill bit of the appropriate size for the tap you plan to use, drill a hole right in the centre of the pin from the un-slotted end. Drill at least ten mm in, but if the drill bit goes right through into the slot, that’s fine. Tap the hole to the appropriate thread, and fit and fasten the screw with the washer on it. This will hold the pin permanently in place.
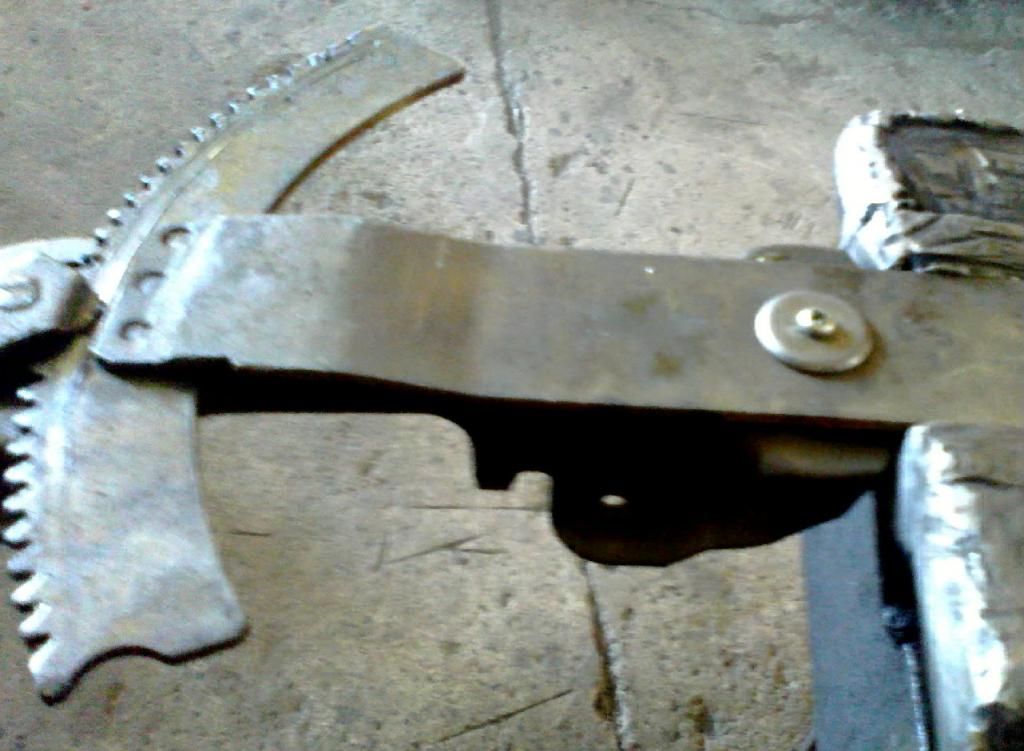
Screw and washer fastened in position
If the slot in the spring was damaged by peening the other end of the pin, make sure that the flat “wing” in the middle of the coil would still go into the slot. If not, use a file to restore the shape of the slot!
To reattach the spring, place the outer wing of the spring in position on the pin that was not worked on, and wind up the spring using a pair of pliers on the flat “wing” in the centre of the spring. Wind it clockwise until it would go into the slot in the repaired pin. Make sure that the spring is coiled and wound in the right direction. Follow the spring outward from the flat wing in the middle of the coil. It should coil anti-clockwise.
Direction of coil
Test the operation by attaching the winder handle and winding the mechanism a few times in each direction. It should work very easily. Take the time to clean and lubricate the gear teeth and the pinion mechanism, as the door might not be disassembled for another thirty years!!
Refit the mechanism, making sure all bolts fit on their old marks in the paint. Make sure the sliding section of the mechanism is correctly fitted into the guide inside the door cavity. Check that the glass is properly fitted into the guide rubbers, as winding up the window when the glass is not in the guides may shatter it! Test the operation of the mechanism before fitting the doorpanel!!
Remember to fit the plastic sheet under the doorpanel. I use contact glue, and it works pretty well. Getting the doorpanel to fit into the rubber behind the window can be very tricky, but it’s a simple case of lining it up with the slot in the rubber, while lining the catch on the back of the oddments bin with the slot in the doorframe. Once the panel is fitted at the top end, simply snap the plastic lugs back in using deft blows with the palm of the hand.
And that’s it! A little intricate, but really worth it, as these parts are becoming very expensive indeed!!
Phil
I have encountered at least ten of these cases in my exploits with 123’s, and it’s always been the same problem: the locating pin (pointed at in the first picture) that holds the pinion (the part that is wound by winding the handle) to the rack (the curved gear teeth) comes adrift.
I was recently given a W123 200 that I did some minor work on a few years ago, and the day I drove it back home, the mechanism bought it! Go figure!
Here are the steps I took (as I have done with at least 6 previous cars) to repair this. The repair is inexpensive and permanent, but some workshop skills and equipment are required.
You will need: Flat head screwdrivers
Phillips head screwdrivers
10mm spanner and/or
10mm socket and extension
Ball-peen hammer
Electric drill
3.2mm (or other appropriate) drill bit
M4.0 x 0.7 tap (or any size between 3.5mm and 5mm)
Appropriate screw to fit the hole made with the drill and tap
Fender washer to fit the screw
Pliers
Contact glue
First off, remove the doorpanel. To achieve this, remove the window winder handle by sliding the plastic trim off the handle by pushing it from the knob to the centre. Use a flat screwdriver to lightly wedge between the knob and the plastic trimpiece if necessary. With the trimpiece off, the handle should simply pull off the splines of the pinion with very little effort.
Use the flat screwdriver to wedge out the black plastic “dish” behind the inner doorhandle. Once the dish has been removed, undo the screw holding the chromed trim frame under the handle, and remove the frame. Undo the screws holding the “c” shaped chromed trimpiece over the doorlock mechanism, and remove the trimpiece. If your car has central locking, do not attempt to remove the locking pins, as they do not screw onto the lever inside the doorpanel. If it has manual locking, the pins can, and will have to be screwed out. Remove the two screws from the grabhandle using a phillips screwdriver in the holes in the bottom of the handle.
Get your fingers between the doorpanel (NOT A SCREWDRIVER) and the metal frame of the door. There are small plastic lugs that are attached to the doorpanel and snap into holes in the doorframe. Snap these lugs out of the doorframe by tugging rather heavily at the panel. Try to tug with your fingers as close as possible to the lugs to avoid excessive bending of the doorpanel.
Once all the lugs are out, the oddments bin on the doorpanel, and the top of the panel, just behind the rubber seal of the window will still hold the panel to the frame. Lift the panel (Often, these panels have not been removed for thirty odd years, so they do need some persuasion) out of the rubber behind the window, and the oddments bin will also be lifted out.
The plastic sheet behind the panel is very important for dust-proofing. Remove it in such a way that it can be fitted again, using contact glue.
Remove the two bolts holding the bottom edge of the window to the mechanism (one is right near the edge of the door, and will have to be removed through the smallish hole right on the free edge of the doorframe). Lift the glass out of the mechanism, and set it down gently in the bottom of the door.
Remove the four bolts around the pinion (that’s the splined shaft the handle attaches to), and after marking (or just noting the marks on the paint made by the bolts) remove the two bolts near the free edge of the door, holding the sliding part of the mechanism. Now manoeuvre the mechanism out of the door by getting the sliding section out first, then the pinion section.
Loose pin and arthritic finger
Note the two slotted pins protruding from the mechanism. The one I am pointing at in this picture should protrude right through both plates and should be burred on the underside (the opposite side to the slot) to prevent it from pulling out. This burr has normally given up the good fight, and the pin pulled itself out of the rear plate (that’s the one with the curved rack on the end). If the coiled spring wasn’t attached to the mechanism as it came out, fish it out the door cavity, it cannot have fallen out!
Using the ball-peen hammer, tap the pin back through the square hole in the (rack)plate, and “set” it by burring the end of the pin (not the slotted end!!) so it cannot pull out easily. Be careful not to hit too hard, as this will damage the slotted end of the pin! This burring is not enough to keep the pin in position permanently, and since the pin is not made of steel, it cannot be simply welded in.
Please excuse the poor quality of the photographs... This one shows the back end of the pin after setting.
In order to find an appropriate screw, first see (if you have a set of taps and dies) if you have any taps of around 4mm. Then attempt to find a screw of the same thread as the tap. Else, you will have to buy both a screw and a tap. I am in the fortunate position to a “glory box” with thousands of bolts, nuts, washers and various odds, ends and other paraphernalia where I found a screw of M4.0 x 0.7 thread, with a washer with an outside diameter of 15mm, and i also have access to literally hundreds of taps. I suggest keeping the sizes of the screw between 3.5 and 5mm. Smaller than 3.5 would not be strong enough, and larger would diminish the diameter of the pin to such an extent that it may break.
Here are the screw and washer I found.
Using a drill bit of the appropriate size for the tap you plan to use, drill a hole right in the centre of the pin from the un-slotted end. Drill at least ten mm in, but if the drill bit goes right through into the slot, that’s fine. Tap the hole to the appropriate thread, and fit and fasten the screw with the washer on it. This will hold the pin permanently in place.
Screw and washer fastened in position
If the slot in the spring was damaged by peening the other end of the pin, make sure that the flat “wing” in the middle of the coil would still go into the slot. If not, use a file to restore the shape of the slot!
To reattach the spring, place the outer wing of the spring in position on the pin that was not worked on, and wind up the spring using a pair of pliers on the flat “wing” in the centre of the spring. Wind it clockwise until it would go into the slot in the repaired pin. Make sure that the spring is coiled and wound in the right direction. Follow the spring outward from the flat wing in the middle of the coil. It should coil anti-clockwise.
Direction of coil
Test the operation by attaching the winder handle and winding the mechanism a few times in each direction. It should work very easily. Take the time to clean and lubricate the gear teeth and the pinion mechanism, as the door might not be disassembled for another thirty years!!
Refit the mechanism, making sure all bolts fit on their old marks in the paint. Make sure the sliding section of the mechanism is correctly fitted into the guide inside the door cavity. Check that the glass is properly fitted into the guide rubbers, as winding up the window when the glass is not in the guides may shatter it! Test the operation of the mechanism before fitting the doorpanel!!
Remember to fit the plastic sheet under the doorpanel. I use contact glue, and it works pretty well. Getting the doorpanel to fit into the rubber behind the window can be very tricky, but it’s a simple case of lining it up with the slot in the rubber, while lining the catch on the back of the oddments bin with the slot in the doorframe. Once the panel is fitted at the top end, simply snap the plastic lugs back in using deft blows with the palm of the hand.
And that’s it! A little intricate, but really worth it, as these parts are becoming very expensive indeed!!
Phil
Last edited:
